

Like most people, you probably assumed that night vision is expensive military technology that regular folks can’t get their hands on. And if you’re talking about professional-grade Gen 3 night vision goggles, that’s true – those cost thousands of dollars.
But here’s something very interesting: you can build a working night vision setup using parts from an old smartphone and a handful of cheap components you can order online. It won’t match what the military uses, but it will let you see in complete darkness, and the whole project can cost you less than fifty dollars.
This works because of how digital camera sensors are built. And once you understand the basic principle behind it, the build itself is surprisingly easy.
How This Works
 Every smartphone camera has a sensor – either CCD or CMOS – that is naturally sensitive to infrared light. Not just visible light, but infrared radiation up to around 1000 nanometers.
The problem is that phone manufacturers don’t want infrared messing up your normal photos, so they put a tiny filter in front of the sensor that blocks IR light.
It’s called an IR cut filter, and it’s the only thing standing between your phone camera and the ability to see in the dark.
When you remove that filter, your camera suddenly becomes sensitive to infrared light that your eyes can’t see. Pair that modified camera with an infrared light source, and you have a working night vision system. You flood an area with invisible IR light, the camera picks it up, and you see everything on the screen even though to your naked eye the room looks pitch black.
This is how most affordable security cameras work. It’s also the same basic principle behind digital night vision devices that sell for hundreds of dollars. You’re just building one yourself from salvaged parts.
What You Need
Before you start pulling things apart, get everything together.
The parts list is short, and most of it you probably already have or can get for a few dollars:
- An old smartphone. It doesn’t have to be anything fancy. An old Android phone that’s been sitting in a drawer for years is perfect. The camera quality doesn’t matter much because you’re going to modify it, and the image will be displayed in infrared anyway. What matters is that the phone still turns on and the camera still works.
- A phone repair kit – small screwdrivers and a plastic prying tool. Phone disassembly requires getting into tight spaces without damaging ribbon cables, and metal tools can short things out or scratch components. A basic kit from Amazon costs almost nothing and has everything you need.
- Infrared LEDs (850nm wavelength). These are the light source that will illuminate whatever you’re looking at. Most phone camera sensors are more sensitive to 850nm than the 940nm alternatives, so stick with those. You can buy a pack of thirty 5mm IR LEDs for a couple of dollars. If you don’t feel like building your own IR light from scratch, you can also just buy a cheap IR flashlight designed for security cameras. They run between five and fifteen dollars online and work perfectly for this.
You’ll also need a small resistor (330 ohms is standard for this) if you’re wiring your own LED array, a battery holder, and some basic wire. If you’re going with a ready-made IR flashlight, you can skip the electrical work entirely.
Removing the IR Filter
This is the core of the project, and it’s where you need to be careful. You’re going to open up the phone, get to the camera module, and remove the infrared blocking filter that sits in front of the sensor. Follow these steps in order:
- Power the phone off completely and remove the battery if it’s removable. You don’t want anything running while you’re working inside.
- Take the back cover off. Most older phones have screws holding the frame together, and once those are out, you can gently pry the back panel away. Work slowly and don’t force anything. Ribbon cables connect various parts of the phone to the motherboard, and snapping one means that the component is dead.
- Locate the camera module. On most phones, it’s easy to spot – it’s the small square or rectangular component on the back of the motherboard, usually with a small connector that you can carefully unplug. Once the camera module is free, you need to get into the lens assembly itself.
👉 6 Ancient Methods to Find Your Way Without GPS or a Compass (Tested & Proven)
- Unscrew the lens carefully. The lens is typically screwed or glued into a small housing that sits on top of the sensor. Between the lens and the sensor, you’ll find a tiny piece of glass that looks slightly red, blue, or green depending on the angle you hold it. That’s the IR cut filter.
- Remove the IR filter. In some phone cameras, this filter is glued directly to the lens holder. In others, it sits loosely and can be lifted out. If it’s glued, you’ll have to carefully break it out using a tiny flathead screwdriver or a needle. Take your time here. You don’t want glass fragments falling onto the sensor surface.
- Reassemble and test. Put the lens back onto the camera module and plug everything back in. Don’t bother putting the whole phone back together yet. Power it on, open the camera app, and point a TV remote at the camera. Press any button on the remote. You should see a bright purple or white light coming from the front of the remote on your phone screen. If you do, the IR filter removal worked. Your camera can now see infrared.
One warning: removing the IR filter means normal photos will look weird after this. Colors will appear washed out and shifted, with a strong pink or purple cast. This phone is now a dedicated night vision device, not a regular camera anymore. That’s why you want to use an old phone you don’t care about.
Building or Buying Your IR Light Source
 Your modified camera can see infrared, but there needs to be infrared light for it to pick up. In total darkness, there’s very little ambient IR light, so you need to provide your own.
The easiest option is to buy a ready-made IR illuminator. An 850nm IR flashlight designed for security cameras or hunting will work out of the box. You turn it on, point it at whatever you want to see, and look through your modified phone camera.
The flashlight emits light that is invisible to the human eye but lights up your camera’s view like a regular flashlight would in normal conditions.
If you want to build your own IR illuminator, it’s a simple circuit. Take five 850nm IR LEDs and wire them in series with a 330 ohm resistor, then connect that series string to a battery pack. A pair of AA batteries provides enough voltage to drive a small string of LEDs.
You can connect several of these strings in parallel to make a brighter array. Thirty LEDs in a small cluster gives you a decent amount of IR illumination for close to medium range, maybe five to ten meters in a dark room.
Mount the LEDs on a small piece of perfboard or even just hot-glue them together in a cluster. Point them forward, connect them to the batteries, and you have a working IR illuminator.
It won’t be visible to anyone looking at it with their bare eyes, though 850nm LEDs do produce a very faint red glow if you look directly at them up close. If stealth matters to you, 940nm LEDs are completely invisible, but your camera will be less sensitive to them, so the image will be dimmer.
Putting It All Together
Now you have two pieces: a phone with a modified camera that can see infrared, and an IR light source. Using them together is as simple as turning both on and pointing them in the same direction.
For a more permanent setup, you can mount the phone and the IR illuminator together on a bracket or inside a 3D-printed housing. Some people mount the phone inside a cheap VR headset so they can look through it hands-free, which essentially gives you night vision goggles.
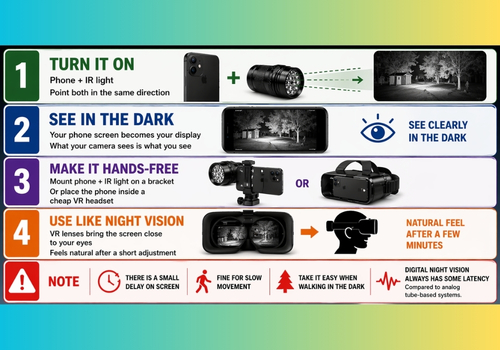
The phone screen becomes the display, and because VR headsets have lenses that focus the screen close to your eyes, it feels surprisingly natural after a few minutes of adjustment.
If you go the VR headset route, keep in mind that there will be a slight delay between what the camera sees and what appears on the screen. It’s usually not enough to be a problem when walking around slowly, but it’s not something you want to rely on while running through the woods. Digital night vision always has some latency compared to analog tube-based systems.
What to Expect and What Not to Expect
There’s no point sugarcoating this. A DIY build from phone parts is not going to compete with professional night vision equipment, and anyone who tells you otherwise is lying. But that doesn’t mean it’s useless. Far from it. Here’s what you’re actually getting and where the limits are.
👉 THIS $0.10 Zip Tie Technique Will Make Your Garage 100% Looter-Proof
What you will get:
- Clear visibility in total darkness at ranges of about five to fifteen meters, depending on how powerful your IR illuminator is.
- The ability to record video and take photos in the dark, which is something even expensive analog night vision can’t do without additional equipment.
- A cheap, replaceable, and easy to repair setup where every component can be swapped out independently. If something breaks, you’re out a few dollars, not a few thousand.
What you won’t get:
- The range, clarity, or responsiveness of a proper night vision device. Military-grade systems use image intensifier tubes that amplify existing light thousands of times over. They work passively, meaning they don’t need to emit any light at all.
- Stealth. Your DIY setup is active night vision – it needs to blast IR light into the scene – which means someone else with night vision equipment could potentially see your IR illuminator.
- Sharp image quality. You’re limited by whatever camera sensor your old phone had. Don’t expect crisp footage. Expect something closer to grainy security camera video.
That said, grainy security camera footage in total darkness is more than enough for wildlife watching, a little bit of backyard security, or just having a project that actually does something cool when you’re done building it. For under fifty dollars and an afternoon of tinkering, that’s a pretty solid return. 👉 Click here to reveal 70+ survival DIY projects and ideas!
A Few Safety Notes
 Infrared LEDs are generally safe at the power levels used in this project, but don’t stare directly into them at close range.
Your eyes can’t see the light, which means your pupils won’t constrict to protect themselves the way they would with visible light.
At a normal working distance of a meter or more, a small LED array poses no risk, but pressing your eye against a high-power IR LED is a bad idea. Also, if you’re salvaging phone parts, be careful around the battery. Lithium-ion batteries can swell, leak, or catch fire if punctured or bent.
If the battery in the old phone looks puffy or damaged in any way, don’t use it. Remove it carefully and power the phone through USB instead.
This project is a great introduction to how digital imaging works, how infrared light behaves, and how surprisingly simple the technology behind night vision actually is.
For under fifty dollars and an afternoon of work, you can see in the dark. That’s a hard deal to beat.
The Real Value Behind Projects Like This
Building something like this from scratch does more than just give you night vision. It shows you that useful, real-world tools don’t always require expensive gear or specialized training.
When you understand the basics, you can adapt, fix problems on your own, and create solutions with what you already have. That kind of skill matters a lot more than people think, especially when you can’t rely on ready-made tech.
And once you see how simple something like night vision really is, it makes you question what else is being overcomplicated. Because a lot of systems aren’t as “advanced” as they’re made to look. They’re just built on principles most people never get to see.
That’s why things like the Orgon Motor are getting attention right now.
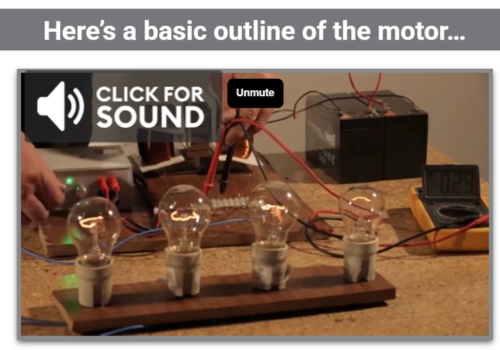
It’s a small, unconventional setup that shows motion and energy in a way most people haven’t been exposed to. You don’t need technical knowledge to get it. You just watch it run.
If this kind of hands-on, “there’s more to this than I thought” idea caught your interest, take a look here.
You may also like:
 How to Defend Yourself Against Night Vision
6 Life-Saving Tools You Can Create in the Wild (VIDEO)
If You Own A Mobile Phone This Is What The Government, Google & Facebook Know About You
Finally, A Cheap Thermal Vision Device
How to Tap a Phone Line for Power When SHTF
Read the full article here


")

