

We may earn revenue from the products available on this page and participate in affiliate programs. Learn More ›
One of the easiest ways for backpackers and backpack hunters to cut weight from their kit is by switching from a two-person tent to a one-person tent. But not all single-occupancy shelters are created equal: they span a range of setup styles and dimensions, with some perfect for pint-sized beginners and others better suited for 6-foot-plus experienced trekkers. To help you find the right option for your size, experience level, and needs, Outdoor Life writers and contributors put over a dozen models of the best one-person tents to the test.
How We Tested the Best One-Person Tents
Since the most common reason to choose a one-person tent over one of the best two-person tents is to save weight in your backpacking kit, Outdoor Life’s inaugural backpacking gear test included a comprehensive look at the one-person versions of the best ultralight tents. We had testers across a range of experience levels give us insight on which tents were approachable for beginners or could be put up in a flash when the weather turns, and which tents require a more precise setup to be truly weather ready. Since then, I’ve had the chance to test additional one-person tents, both lightweight and ultralight, in the backcountry. We’ve also included to test tents on other backpacking gear tests, including along a section of the Pacific Crest Trail in the Goat Rocks Wilderness. Here, I’ve included the most impressive results from my personal testing, our test of the best ultralight tents, and my test of the best 4-season tents.
All tents were evaluated for ease of setup, weight, functional length and width, and interior living space. While I’ve provided the dimensions in the above table, keep in mind that the pitch angle of the walls of the tent will affect how much of that interior space you can use.
| Tent | Price | Style | Weight | Length | Width | Height |
|---|---|---|---|---|---|---|
| Big Agnes Tiger Wall | $400 | Semi-freestanding | 2 pounds, 2 ounces | 84 inches | 38 to 26 inches | 39 inches |
| Durston X-Mid | $240 | Trekking poles | 1 pound, 12 ounces | 90 inches | 32 inches | 46 inches |
| Gossamer Gear The One | $255 | Trekking poles | 1 pound, 6 ounces | 84 inches | 33 to 21 inches | 45 inches |
| Gossamer Gear Whisper | $500 | Trekking poles | 10 ounces | 102 inches | 49 to 25 inches | 51 inches |
| Mountain Hardwear Nimbus | $400 | Semi-freestanding | 1 pound, 14.8 ounces | 86 inches | 38 to 28 inches | 38 inches |
| MSR Access | $680 | Freestanding | 3 pounds, 8 ounces | 84 inches | 33 inches | 40 inches |
| MSR Freelite | $420 | Semi-freestanding | 1 pound, 15 ounces | 87 inches | 33 inches | 39 inches |
| NEMO Hornet OSMO | $400 | Semi-freestanding | 2 pounds, 4 ounces | 87 inches | 43 to 31 inches | 39 inches |
| Sierra Designs High Side | $300 | Non-freestanding | 2 pounds, 8 ounces | 88 inches | 34 to 26 inches | 32 inches |
| Sea to Summit Alto TR1 | $500 | Semi-freestanding | 2 pounds, 7 ounces | 84.5 inches | 24 inches | 42.5 inches |
| Six Moon Designs Lunar | $260* | Trekking pole | 1 pound, 8 ounces* | 90 inches | 24 inches | 49 inches |
| Stone Glacier Sky Solus | $545 | Freestanding | 4 pounds, 6 ounces | 80 inches | 40 inches | 42 inches |
| Tarptent Protrail | $240 | Trekking poles | 1 pound, 8 ounces | 84 inches | 42 to 30 inches | 45 inches |
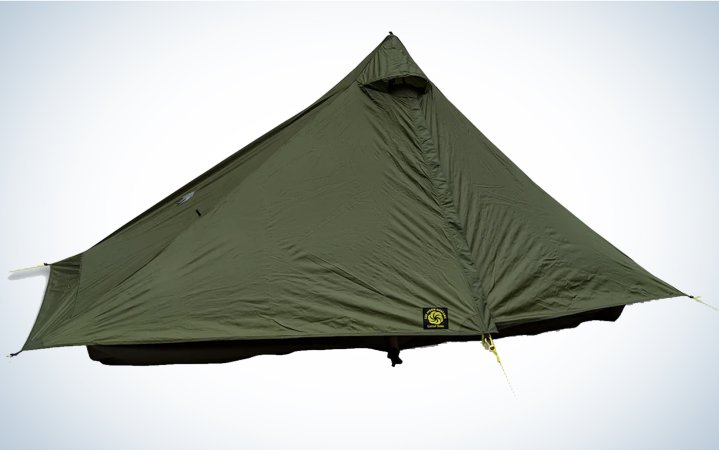
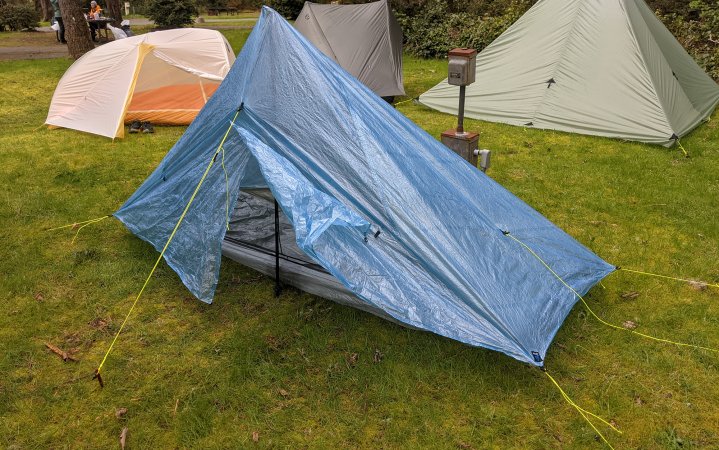
| Zpacks Plex Solo | $600 | Trekking poles | 14.6 ounces | 90 inches | 38 to 28 inches | 52 inches |
Best One-Person Tents: Reviews & Recommendations
Best Semi-freestanding: MSR Freelite
See It
Key Features
- Max Head Height: 39 inches
- Doors: One door
- Materials: Ripstop nylon
- Warranty: 3 years
- Price: $420
Pros
- One of the lightest semi-freestanding tents we tested
- A reasonable choice for individuals up to six feet tall
- Easy to set up
Cons
- Slightly narrower interior space than other tents at this price point
This freestanding tent comes in under 2 pounds for the one-person model. If you are wondering what the catch is, so were we. Setting up the MSR Freelite on our Oregon Coast Trail backpacking gear testing trip was extremely fast (one tester set it up in under two minutes without having used it before), and it took minimal effort to achieve the storm-worthy profile. The interior of the one-person model, while not exactly spacious, was large enough for the biggest sleeping pad on our test (a full-size rectangular Therm-a-Rest NeoAir Xlite NXT), with a backpack fitting handily into the vestibule. Testers reported that it felt larger than it was, which is an important detail if you get stuck inside waiting out a storm. The mesh and fly were extremely lightweight and plenty robust, with the dirt falling right off when we shook it out before stuffing it away for the day. The poles were even made from aluminum, as opposed to splinter-prone carbon fiber. Our only concern was with that 15D bathtub floor — it may benefit from a groundsheet on more challenging terrains — but this was strictly theoretical as we didn’t experience any holes on our testing trip.
While some backpackers prefer the weight savings of a single-wall tent, the extreme condensation of the Oregon Coast showed the advantages of a double-wall setup. While the rest of our testing team was carefully packing up for the day, avoiding the soaked sides of their single-walled tents lest they unleash a rainstorm on their sleep system, the tester in the MSR Freelite could sit up, bump their head on the mesh at the top of the tent, and stay dry.
Read Next: The Best Backpacking Tents
There are only a few small quibbles with this tent. One is the door: It’s on the small side compared to the rest of our field, forcing our tallest tester (5 feet, 10 inches) to pretzel her limbs more than she would have liked when getting out. The included stakes (needle stakes) are also lower quality compared to other options in the MSR arsenal. Consider upgrading to either the lightweight MSR Carbon Cores or the MSR Groundhog Minis, which have great holding power.
Best Design: Durston X-Mid
See It
Key Features
- Max Head Height: 46 inches
- Doors: Two doors
- Materials: Polyester
- Warranty: Two years
- Price: $234
- Also available as a one-pound DCF tent
- Optional carbon fiber poles available (6.2 ounces for a pair)
Pros
- Excellent geometry makes for a stable set up
- Double the vestibule space of typical tents
- Very affordably priced
Cons
- Not as light as some other ultralight tents (DCF version is much more expensive)
- You’ll want to grab some different stakes (included options weren’t the best)
The Durston X-Mid impressed the most experienced member of our backpacking gear testing group, Jac “Top Shelf” Mitchell so much that she chose to take it along with her when she set you to hike the Great Divide Trail — the 700-mile Canadian extension of the Continental Divide Trail. When set up correctly, the Durston X-Mid has incredible geometry, fully taut and secure against wind and rain, not sagging in the slightest when serious moisture sets in. Even when it wasn’t set up perfectly (a loose stake popped on my first night in this tent), it was shockingly stable: I didn’t even notice until morning. Top Shelf reported back that it didn’t take long for her to become so efficient at setting up this tent that she could put it up faster than a freestanding tent.
Even though the rainfly was soaked from the unrelenting condensation of the Oregon Coast on our testing trip, I was completely dry in this tent, thanks to its double-wall setup. What makes the Durston X-Mid’s double-wall set up especially unique is that it was designed to be pitched fly first — no additional groundsheet required. This is such a preferable order of operations in inclement weather that I hope this becomes the norm in the future. Our testers also noticed that the pitch had steeper walls than was typical, which maximizes livability — even if it doesn’t technically give you more floor space.
The Durston X-Mid even had two doors and two vestibules. What one-person ultralight tent has a vestibule for your gear and a totally separate side for you to exit on for a midnight bathroom break? As far as we know, the Durston X-Mid is the only one. This was also one of the lowest priced options in our test. Even though it’s a similar weight to the other double-wall ultralight tents we looked at, the Durston X-Mid is (at the time of this review) about $200 less expensive.
So what’s wrong with this tent? To start: it’s not your lightest option. For the same weight as the Durston X-Mid, you could get a semi-freestanding tent. (Durston does offer a 1-pound version of this tent in DCF, but the price point for that is up there with the Zpacks Solo Plex.) Its setup also proved challenging for testers accustomed to freestanding tents: If this is your first trekking pole tent, give yourself some time and space to play around with perfecting the setup.
Finally, you remember I mentioned a stake popped out the first night we used this tent? That stake had bent while being pushed into reasonably soft ground. I’d plan to replace them with one of the best tent stakes, with an eye toward MSR Groundhog minis or Big Agnes Dirt Daggers.
Read our full review, Durston X-Mid 1 Review: A Beginner-Friendly Ultralight Shelter.
Lightest: Gossamer Gear Whisper
See It
Key Features
Pros
- Ridiculously lightweight
- Surprising interior space
- Conversation starter
Cons
- No dedicated floor
- Harder setup than others on this list
- Comparative lack of privacy
We checked out the Gossamer Gear Whisper on our backpacking gear testing trip to the Goat Rocks Wilderness. Testers described it as one of the most impossible-looking tents they had ever seen. At its core, this tent is something like a cross between a tarp and a single-wall trekking pole tent. It has the weight-savings of the former, but the setup is closer to the latter. Gossamer Gear co-founder Glen Van Peski designed the Whisper for a specific trip he was headed out on, and only 500 were released as an initial limited run — perhaps, at first glance, it didn’t seem like a tent with widespread appeal. But it flew off the shelves, and Gossamer Gear ended up making it a permanent part of their offerings.
After sharing this tent with our testing team, I can see why it has such appeal for a certain subset of ultralight backpackers. There have always been a couple limitations to the tarp setup. The first is that you will be the entree at the buffet for any mosquitoes around. The Whisper solves this nicely by having a mesh skirt along the bottom of the tent. The second is that, for something seemingly so simple looking, tarps are tricky and time-consuming to set up. And that is where the Gossamer Gear Whisper really shines. After I read Glen’s stream-of-consciousness directions on the Gossamer Gear site under the FAQ (which I definitely recommend), it took me less than 10 minutes to set up on my first attempt. The basic idea is to start at the foot, staking out around the shorter trekking pole, and then pull it taut as you stake each successive loop in until you get to the side with the taller trekking pole. I imagine with a bit of practice, I could get this tent up about as quickly as any other trekking pole tent.
Other testers had similarly positive experiences with the setup. Experienced thru-hiker Top Shelf called it a “quick, easy, and self-explanatory,” noting that the DCF makes it easier to create a taut silhouette than you would get with silnylon. Even testers less experienced with tarp-style tents were able to get it up without too much trouble after I provided a recap of the recommended strategy.
Testers’ feelings about actually sleeping in this tent varied dramatically. “It feels like my first tent,” said Top Shelf. “Just enough of what you need and nothing you don’t.” OL associated editor Ashley Thess did not have similar warm fuzzies, stating that she wouldn’t trust this tent in any kind of weather. And one tester opted to forgo sleeping in it at all, swapping on the third night of our test. That turned out to be the windiest night, with several testers set up in more exposed locations reporting their tent structure being compromised. So it was notable that the tester who used the tent, set up with some tree protection, came away impressed with the structural integrity of this tent.
Read Next: The Best Ultralight Tents
“I felt the wind blowing in through the mesh bottom part, but I wouldn’t have known it was windy (maybe 10 mph) because the rest of the tent body was as tight as a trampoline,” she said. “You could bounce a penny off it.”
When I tested this tent on the final night of our trip, I had the chance to experience this firsthand. The tent looked like it was standing up with pixie dust, which didn’t make me feel as secure inside of it as I wanted. But the actual structure was so rigid and taut that no matter how many times I knocked into the center pole, it didn’t move at all.
Gossamer Gear doesn’t opine on how many people this tent will fit, but our take is that, while it just barely fit our two gal testers, it’s really a roomy fit for one. While there is technically space on both sides of the center pole for two sleeping pads, the logistics of cramming in any extra gear or, heaven forbid, the person on the far side needing to use the restroom in the middle of the night, makes this a no-go.
More than any other tent on this list, trust your gut on this one. If you’re an old hand at trekking pole tents or tarp-curious, this could be just what you need to really drive that base weight down. But if the idea of forgoing a floor and having the bottom four inches of your tent be nothing but mesh gives you pause, then go with another pick on this list.
Best Double Trekking Pole: Gossamer Gear The One

See It
Key Features
Pros
- Easy to set up
- Reasonably priced
- Good sized interior that felt homey to our testers
Cons
- Not worth it unless you already use two trekking poles
The Gossamer Gear The One is the total package. It’s easy to set up, even for first-time ultralight tent users. It’s very light (third lightest in our test of the best ultralight tents). It has enough head room to move around comfortably in the morning. The vestibule fit all our gear with room to spare. It packs up small. It even had an interior pocket stow pocket for odds and ends like eyeglasses. Check. Check. Check.
The testers who used this tent during our test of the best ultralight backpacking gear wanted to be in this tent at the end of the day and were happy to wake up in it in the morning—even our tallest tester at 5 foot 10 inches. There was more wrangling to be the next tester for this tent than of any other we looked at.
Both testers who took this tent out reported that they were able to figure out how to set up the tent without directions (something that was decidedly not true for all the ultralight tents in our test). However, they both noted the lack of directions provided in the package—consider downloading these to your smartphone before heading out into the field.
The only downside to this tent is that it requires two trekking poles to set up, making it less weight-conscious for backpackers who don’t already have trekking poles as part of their set up.
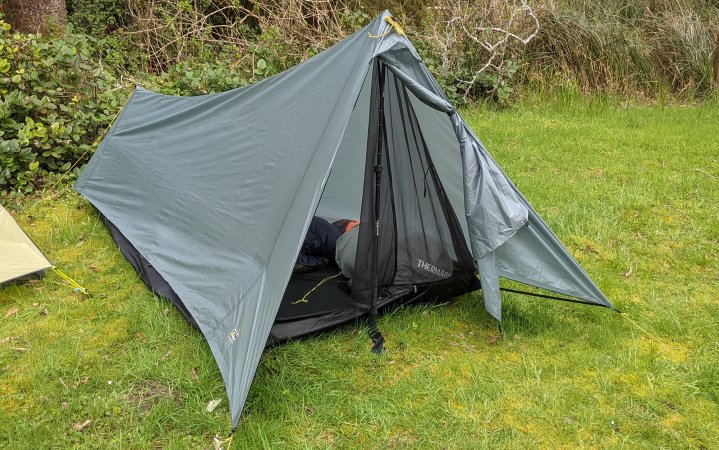
Best Single Trekking Pole: Six Moon Designs Lunar
See It
Key Features
- Weight: 1 pound, 8 ounces (does not include required stakes)
- Dimensions: 90 x 48 x 49 inches (tapers steeply at both the head and foot)
- Ease of Setup: Moderate difficulty
- Interior Space: Poor
- One trekking pole required
Pros
- Easy to set up
- Ability to adjust the door guyline from inside the tent
- Affordable
Cons
- Low walls can be claustrophobic
Maybe you’re like me: You don’t typically use trekking poles while hiking, but you’ve been known to toss one into your pack for gnarly river crossings or for extra stability on steep, snowy terrain. But there’s no way you’d carry two just to use in a trekking pole setup—at that point you might as well just use a freestanding model.
The Six Moon Designs Lunar is one of the few ultralight tents that uses a single trekking pole in its design rather than two. The result is a modified teepee structure that was surprisingly intuitive to set up. Despite having never used this tent, I was able to put it up in only a couple of minutes without directions.
It also had a few details I appreciated. The first was a vent on the top of the tent. It didn’t help with the unrelenting fog of the Oregon Coast, but in drier climes it would reduce condensation buildup from exhaling inside your tent. It also had a tension adjustment for the rainfly door inside the tent, a thoughtful detail that I haven’t seen before. This would allow you to get rid of excess slack (typically caused by wind or condensation) in the part of the tent covering your gear without having to get out of your tent.
While the peak height of this tent is sufficient, I found it difficult to avoid bumping my head against the condensation-soaked tent walls in the morning. This was in part due to my site location: I was pitched on slightly uneven ground, which made it difficult to achieve the steeply sloped walls that would have been possible on flat ground.
While this tent is affordably priced, note that the price does not include stakes; you’ll need to purchase those separately. (See our take on the best tent stakes for some ideas.)
Best for Tall People: Tarptent Protrail
See It
Key Features
- Weight: 1 pound, 8 ounces
- Dimensions: 84 x 42/30 x 45 inches
- Ease of Setup: Difficult
- Interior Space: Good
- Two trekking poles required
Pros
- Usable length makes this a great option for taller individuals
- Could fit two people in a pinch
- Affordable
Cons
- Tends to sag in the middle in condensation-prone conditions
- Individuals with a shorter wingspan will struggle with setup
Plenty of people over 6-feet tall won’t even look at a one-person ultralight tent. After all, the easiest way for manufacturers to save weight and protect your UL bonafides is to simply make your tent smaller than the competition. And, to be honest, the all-women testing crew on our ultralight tent backpacking trip, which topped out at five foot ten, was mostly fine with that. But there was one ultralight tent we tried that was clearly built with an over 6-foot individual in mind: the Tarptent Protrail.
While plenty of other ultralight tents claim a similar 84-inch length, few actually have that much usable space, due to the taper of the walls. Not so in the Tarptent Protrail, which has fully vertical sides at the top and the bottom of the tent. We think that anyone up to six foot four would be comfortable lying down inside this tent.
The two trekking poles used in the setup of the Tarptent Protrail were separated lengthwise, 84 inches from one another. That long profile, without any additional support or structure in the center, meant that it sagged noticeably when condensation was present. While this tent was tested in fairly calm conditions, I would have concerns about the Protrail in serious wind conditions if it was angled incorrectly or if wind was coming from multiple directions.
It’s worth noting that shorter people will struggle to set up this tent, as one of our testers discovered on the final night of our trip along the Oregon Coast Trail. That’s because the front trekking pole must be held upright at the same time as you stake out the far door: the wingspan of a shorter individual just can’t reach that far.
Best for Winter: MSR Access 1
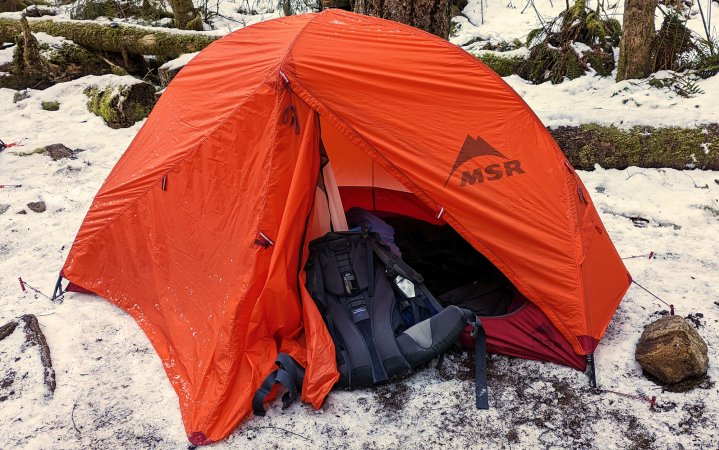
Buy from MSR
Buy from Amazon
Key Features
- Weight: 3 pounds, 8 ounces
- Dimensions: 84 x 33 x 40 inches
- Ease of Setup: Easy
- Interior Space: Average
- No trekking poles required
Pros
- Virtually no condensation
- Comparatively lightweight
- Great stuff sack
- Easy setup
Cons
- Expensive
- Somewhat delicate materials require care
The MSR Access was my pick for the best four-season tent based on testing conducted with the one-person model. First off, it’s extremely lightweight for a winter tent. It sets up easily with little fiddling to achieve a taut structure and had almost no condensation problems during testing. The lack of condensation is especially impressive given that nighttime temps dropped into the low twenties during testing and the individual who used this tent had a hot water bottle stashed in the bottom of her sleeping bag. The temperature differential between the inside and the outside of this tent was substantial, yet moisture did not accumulate.
Unusually, the MSR Access achieves this exceptional ventilation with only one tiny window. The body of the tent itself—20D ripstop nylon—is breathable, helping the moisture generated inside your tent move to the exterior of the fabric. The rainfly’s design maximizes airflow by pushing moisture-laden air from inside the tent to the outside.
One small detail that made a big difference is the design of the MSR Access’s stuff sack. While most tent stuff sacks are longish cylinders with top openings, the MSR Access is a longish cylinder with a large wide side opening. This made packing away a wet tent a breeze, and saved both my and my tester’s fingers from getting unnecessarily cold during the quick cleanup to leave camp.
Best for Hunters: Stone Glacier Sky Solus

See It
Key Features
- Weight: 4 pounds, 6 ounces
- Dimensions: 80 x 40 x 42 inches
- Ease of Setup: Average difficulty
- Interior Space: Excellent
- No trekking poles required
Pros
- Very roomy interior
- Design details make this easier to set up in bad weather
- Protected side vestibules
Cons
- No large vestibule for your backpack
No one plans to get stuck in their tent during a storm, but if it was going to happen to me, I’d want to be in the Stone Glacier Sky Solus. First off, for a one-person tent, it’s exceptionally roomy. Just about everyone will be able to fit not only themselves (the diagonal measurement is well over seven feet), but also the majority of their gear inside the tent with them.
It also takes an unusual approach to the vestibules. Rather than having a single vestibule outside the door of the tent, it has two smaller ones on the sides of the tent. You can access these from inside the tent via a cinch-cord opening. They aren’t massive vestibules, but it’s enough to hold anything you don’t want in the tent with you (best hiking boots or backpacking rain jackets), and they are very protected from the elements by the low-lying rainfly. Generous mesh pockets provide additional storage options on the inside of the tent.
The sides of the tent are protected sufficiently that you could conceivably leave the access points to the vestibules open for extra ventilation overnight. An additional cross-breeze can be obtained by partially opening the door to the tent and a third, small opening at the back of the tent. (When packing up this tent at the end of your trip, ensure the cinch cords are pulled closed from the inside.)
Even the setup of this tent takes the challenges of stormy conditions into consideration. There are two fabric sleeves for the poles that can be unhooked from the body of the tent. This means that in exceptionally bad weather, you could assemble your poles and slot them criss-cross into the sleeves, providing extra stability before you battle the winds to attach the fabric body of the tent.
Mountain Hardwear Nimbus

See It
Key Features
- Weight: 1 pound, 14.8 ounces
- Dimensions: 86 x 33/21 x 45 inches
- Materials: Ripstop nylon
- Warranty: Limited lifetime
- No trekking poles required
Pros
- Intuitive setup
- Able to handle substantial winds
- Very lightweight
Cons
- Head-on entry can be less comfortable for some
- Easy to lose stakes
I took the Mountain Hardwear Nimbus on a solo 45-mile trek around the Goat Rocks wilderness in the Pacific Northwest. I’ll level with you: I had never set this tent up when packing my bag, and I didn’t get around to looking at the directions before heading out. I don’t recommend this (best practice dictates at least putting the thing up in your backyard before rolling out), but it turned out just fine in the case of the Nimbus. This tent was intuitive to set up, and it also performed admirably in fairly substantial wind at elevation.
Like other semi-freestanding tents, there is only one pole for the Nimbus. The main shaft runs down the length of the tent, connecting in the middle of the foot and then splitting at a hub to connect to both corners at the head of the tent. Additional foot space is created by staking out the corners at the foot of the tent. A feature I liked about the Nimbus is that even more interior space is created by clipping a bungee on the body of the tent to the fly.
I fit easily inside this tent and would recommend it for anyone up to five foot ten (I’m five foot five). One note is that this tent has head-on entry, rather than the side entry, more typical for this tent style. While ultralight and lightweight backpackers shouldn’t have any issue fitting their pack into the roomy vestibule, stiff joints may make getting inside the tent a bit of a chore.
What boosted the Nimbus to the top of the semi-freestanding shelters list (in front of the also-impressive MSR FreeLite) is that it manages to get to the sub-two pound mark without compromising on any details. In particular, I was impressed that they included V-shaped tent stakes as part of the kit, which have almost as impressive holding power as tri-beam stakes (the best of the best in my test of the best tent stakes). I experienced both substantial wind and rain on my testing trip, and not only did the Nimbus keep me dry, but I also noticed that I slept better in this tent than in other comparable models because of the security of the overall design.
I only have a couple of quibbles with the Mountain Hardwear Nimbus. The first is the strange bungee that secures the pole bag to the tent body. Ultralight backpackers are very unlikely to use these, as they typically separate their poles from their tent body to pack the interior of their pack more efficiently.
Adding reflective loops to the stakes would have been a better use of that weight. This tent requires no fewer than eight stakes for a full setup, but without any kind of cordage, it is both difficult to pull the stakes out of firm ground or even see them once you’ve taken down the tent in certain kinds of environments.
Read Next: How to Pack a Backpack
NEMO Hornet OSMO
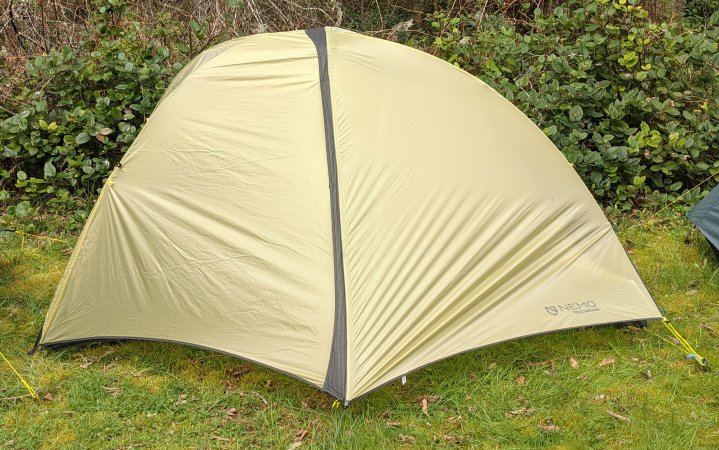
See It
Key Features
- Weight: 2 pounds, 4 ounces
- Dimensions: 87 x 43/31 x 39 inches
- Materials: Ripstop nylon, OSMO
- Warranty: Limited lifetime
- No trekking poles required
Pros
- Eco-friendly materials
- Easy to set up
Cons
- Heaviest freestanding tent we looked at
In recent years there’s been growing awareness that what goes into creating these practically weightless waterproof tent fabrics isn’t always great for the environment. If this is starting to weigh on you (it’s starting to weigh on us), then the NEMO OSMO series is one to seriously consider.
NEMO is one of the backpacking gear companies leading the charge in creating more environmentally sustainable fabrics and processes. Their OSMO tent fabric is made from 100 percent recycled material (a composite of polyester and nylon) and achieves an impressive water repellency without the use of PFAS.
The NEMO Hornet OSMO is a semi-freestanding tent that holds its own in the ultralight arena. It was just a couple of ounces heavier than the other semi-freestanding tents we looked at (the Big Agnes Tiger Wall UL, MSR Freelite, and Mountain Hardwear Nimbus UL), with similar interior space and ease of setup. If you’re looking to reduce your impact on the environment, this is a great option that will keep your backpacking kit ultralight.
Big Agnes Tiger Wall

See It
Key Features
- Max Head Height: 39 inches high
- Doors: One door
- Materials: Ripstop nylon
- Warranty: Limited lifetime
- Price: $400
Pros
- Very similar to our best overall pick, the MSR Freelite
- Comparatively spacious floor space
Cons
- Heavier than other picks on this list
While testers on our Oregon Coast Trail testing trip raved about the MSR Freelite’s ease of setup and light weight, they were equally enthusiastic about the Big Agnes Tiger Wall. This one is just as easy to set up, with a hair more interior space across its lineup of sizes. But, given the increase in floor space isn’t reflected by an increase in head height, the bump up in weight doesn’t quite make it worth it by our estimations. But if you find that you tend to collapse the sides of the bathtub floor in the more narrow MSR Freelite, then this one is certainly worth a look.
See It
Key Features
Pros
- By far the lightest tent in our test
- Single pole set up
Cons
- Expensive
- Experience needed to achieve the correct pitch
- Requires a taller trekking pole to pitch properly
Our testers had more mixed feelings about the Zpacks Plex Solo than anything else we looked at. The weight of this tent impressive; it’s also twice the price of our best overall pick in the trekking-pole category. The Dyneema shell that helps give this tent its low weight was also surprisingly cozy, with our tester noting that it was easily 5 degrees warmer inside than out. Nonetheless, if the pitch wasn’t just so, it felt, in the words of one tester, like “sleeping inside of a wet trash bag.”
The incorrect pitch was not for lack of trying. Our tester, who described the provided instructions as some of the best we looked at, spent a long time trying to get this one right. But then she’d get into the tent and realize something wasn’t quite right with one or more of the ten stakes. After getting out to adjust the stakes and the guylines, she’d get in again, and see that now something new was wrong. By morning, she was pretty frustrated, but other members of the testing trip who had used Zpacks before simply nodded sagely. The pitch on these tents is tough to master.
We also had concerns about its storm-readiness. Unlike other ultralight tents, there is no zipper on the door, just clips at the corners of the two sides that secure to a stake. That means rain and wind can both push their way through if you haven’t protected yourself by some other means. Experienced thru-hikers will know if this is a risk they are willing to take. After all, some trails are unlikely to see conditions that would make this an issue, and there is always the option to prop your backpack up in the door to provide some extra protection. But we think early-career ultralight backpackers should think twice before committing to a setup like this.
If you’re new to ultralight tents, especially if you’re new to trekking pole tents, we think you should shelve this one for the time being and opt for a slightly heavier model like the Gossamer Gear THE ONE or Durston X-Mid-1. But if you’ve been using ultralight tents for some time, and are ready to upgrade to that elusive sub-10 pound kit, then this should absolutely be on your short list.
Like the Six Moons Lunar Solo, this one doesn’t come with stakes — you’ll need to buy those separately. While our first recommendation is for the MSR Groundhog Minis, that’s going to push you up over the one pound mark. To keep this under a pound in total weight (and get all ten stakes — you’ll need them to take full advantage of the interior space), go for the MSR Carbon Core.
The last note is to check your current trekking poles. The best pitch is achieved with a pole set to 132 cm in length, but some poles don’t extend that far.
Sea to Summit Alto TR1
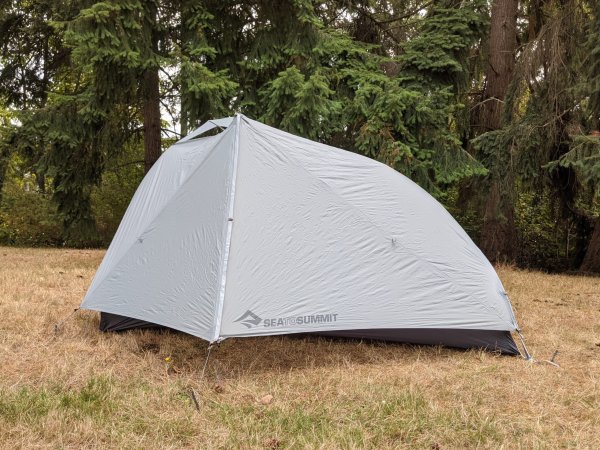
See It
Key Features
- Weight: 2 pounds, 7 ounces
- Dimensions: 84.5 x 24 x 42.5 inches
- Ease of Setup: Easy
- Interior Space: Great
- No trekking poles required
Pros
- Great interior space that punches above its stated dimensions
- Ventilation at the top of the tent
- Interior lighting option
Cons
- Three separate packing sections is excessive
- Expensive
Plenty of one-person tents have a reputation for being fairly claustrophobic, so it was great to get inside of the Sea to Summit Alto TR1 and discover that it was fully bucking that trend. While its stated dimensions are, if anything, on the short and narrow side for a one-person tent, a slight tweak to how the overhead poles are designed makes it feel more spacious than other tents with similar head heights.
The difference here is that the short cross-section of the single pole that gives this semi-freestanding tent its shape is angled upward, rather than down. That means that the head height of this tent (42.5 inches) is maintained across its width, near the center of the tent—right where you would typically sit up. I have a very long midsection and it was clear that I would have plenty of space to sit up and move around—even change—inside.
One other unique feature of the Sea to Summit Alto TR1 is the addition of a light bar that you connect to the roof of your tent via snap buttons. This gives you the option of creating a fairly substantial and pleasant reading light. For many lightweight and ultralight backpackers, this feature is likely to be left in the camping bin in their garage due to the added weight, more traditional backpackers may appreciate its utility.
The biggest downside of this one-person tent is its price: the only two tents more expensive than this had four-season capabilities.
Sierra Designs High Side
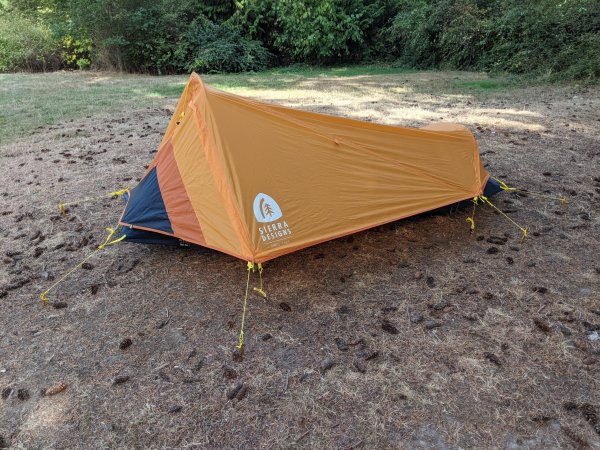
See It
Key Features
- Weight: 2 pounds, 8 ounces
- Dimensions: 88 x 34/26 x 32 inches
- Ease of Setup: Average difficulty
- Interior Space: Poor
- No trekking poles required
Pros
- Significantly lower price than most other options on this list
- Straight-forward setup appropriate for early-career backpackers
Cons
- Not a semi-freestanding tent (will collapse if the stakes come out)
- Cramped interior
One-person tents sometimes feel like they fall into one of two categories: either they’re semi-freestanding models that are a breeze to set up but cost an arm and a leg, or they’re affordable trekking-pole tents with a steep learning curve. The Sierra Designs High Side struck a middle note between those two scenarios. It’s reasonably simple to set up (no trekking poles required) and costs an easy $100 less than comparable semi-freestanding models. It does weigh a few ounces more than other lightweight or ultralight one-person tents, but it still weighs light years less than a standard two-person tent.
There are some downsides to the Sierra Designs High Side, however. The most obvious one is its height. This was the shortest tent I looked at, and you really feel that on the inside. There’s more space here than in a typical bivy, but there is not enough space to sit up. The net effect is fairly claustrophobic. I’d save this one for the height of summer, where you are likely to be spending your evening hours out of the tent anyway (and may even experiment with cowboy camping).
The other issue here is that this tent is not freestanding. With semi-freestanding tents, every single one of your stakes could pop out of the ground and your tent would still be standing, just minus a fair bit of floor space. But the pole design of the Sierra Designs High Side—which I’d wager is how they kept the cost and weight down at the same time—span the width, rather than the length of the tent. Most of the time this won’t be an issue, but if you are planning to camp out on a rock slab without easy purchase for stakes, this tent will be much more difficult to get set up.
Things to Consider Before Choosing a One-Person Tent
Weight of the Best One-Person Tents
The whole reason you are looking at a one-person tent, as opposed to a much more spacious, comfortable two-person tent, is to save on weight, right? Right. Do not even consider a one-person tent that is over three pounds: at that point you might as well start looking to see what lightweight or ultralight two-person models are on clearance. The exception to this is tents built for the worst weather conditions like the Stone Glacier Sky Solus or the MSR Access 1.
Size of the Best One-Person tents
While the stated dimensions of each of these tents will help give you an idea as to whether you and your sleep system will fit inside of a given one-person shelter, the only way to really know if a one-person shelter will feel roomy enough to sleep in night after night or a bivy-style coffin is to get inside of it yourself. I’ve provided notes in the above as to how roomy (or cramped) each tent feels, but, if possible, try each one you are considering out for yourself before making a final purchase.
Freestanding versus Trekking Poles
There are essentially six styles of tents out there: freestanding, semi-freestanding, non-freestanding, single trekking pole, double trekking poles, and tarps. Freestanding tents are akin to what you see at the campground, tents where stakes are not required for the structure of the body of the tent. Semi-freestanding tents use stakes to flesh out the body of the tent, but will stand up without them.
Non-freestanding tents need the tension created by staking out the corners to stand up. Trekking pole tents are all a type of non-freestanding tent, but ones that use some of the best trekking poles, rather than dedicated poles. Some require a single trekking pole to use; others require two. Camping tarps are a type of trekking pole tent and are some of the most minimalist (and lightest) options out there. These are typically only suitable for the most advanced backcountry users as they require knowledge and experience with different knots and tensioning techniques.
Price of the Best One-Person Tents
If you’re considering a one-person tent, odds on are that you are considering a serious expedition, like a thru-hike, where you’ll be counting every ounce. Despite their high price, quality light and ultralight one-person tents are one of the most efficient ways to spend your money to save weight. This is one where it’s worth it to pay a bit more.
FAQs
One-person tents typically work best for individuals who are on the smaller side. There are a couple of one-person tents on the above list that are appropriate for individuals over six-feet, but typically these individuals find they are more comfortable with two-person tents, especially if they are on the stockier side.
While there are one-person tents that weigh in excess of four pounds, you shouldn’t consider one that is over three pounds.
The best way to pack a tent on your backpack is to start by separating out the poles from the body of the tent. Place the body and rainfly into your backpack; without the poles, it’s a lot easier to stuff in and position around the rest of your gear. The poles go into one of the side pockets of your backpack, secured by a compression strap. While it is popular to lash tents onto the bottom of a backpack, this style of packing places too much heavy weight on the bottom of your pack, which can drag down your shoulders.
Final Thoughts on the Best One-Person Tents
If you’re getting serious about solo adventures, investing in one of the best one-person tents is a great way to save ounces—even pounds—from your kit. I’ve tested, both on my own and in parallel to other testers, over a dozen of some of the best one-person tents on the market, including top lightweight and ultralight models from Big Agnes, NEMO, MSR, Mountain Hardwear, Sierra Designs, Stone Glacier, Tarptent, Dan Durston, Gossamer Gear, Sea to Summit, and Six Moon Designs. Here are my picks for the top one-person tents across a variety of styles.
Read the full article here


