
How to Light Charcoal Without Lighter Fluid – 7 Proven Methods Every Prepper Should Know

Lighter fluid is a convenience, not a necessity. When the grid goes down, supply chains break, or you simply run out, knowing how to light charcoal without lighter fluid could mean the difference between a hot meal and going hungry. This is not a campfire trick. It is a core preparedness skill.
The methods covered in this guide range from zero-equipment techniques using only newspaper and kindling, to simple tools you can stockpile cheaply right now. Each one has been used in real-world conditions. Whether you are grilling in your backyard today or cooking in a crisis tomorrow, these skills will serve you.
According to the U.S. Fire Administration, lighter fluid is one of the leading causes of grilling fires and injuries in America. Switching to these safer methods is not just a prepper move. It is the smarter choice for every household.
Why You Should Never Depend on Lighter Fluid
Lighter fluid is petroleum-based, highly flammable, and has a shelf life. It can leak, evaporate, or become unavailable. In a grid-down or supply shortage scenario, that single dependency becomes a serious vulnerability in your food prep chain.
Beyond preparedness, there are strong practical reasons to ditch lighter fluid even in normal times:
- It can impart a chemical taste to food if coals are not fully ashed before cooking
- It is a fire hazard, especially when added to already-lit coals
- The fumes are harmful when inhaled in enclosed or poorly ventilated spaces
- It creates unnecessary cost in a long-term food storage and cooking plan
- Most emergency scenarios will see petroleum products disappear from store shelves quickly
The CDC warns that exposure to petroleum distillates like lighter fluid can cause respiratory irritation and, at high concentrations, more serious health effects. For a prepper cooking for a family, eliminating this risk entirely is worth the small upfront effort of learning alternative methods.
What You Need to Know Before You Start
Regardless of which method you use, a few fundamentals apply every time you light charcoal without lighter fluid:
- Use dry charcoal. Moisture is the enemy of ignition. Store your charcoal in sealed containers or bags in a dry location.
- Arrange coals in a pyramid or tight cluster before lighting. This concentrates heat and allows coals to ignite each other as they light.
- Allow adequate air flow. Charcoal needs oxygen to catch and sustain. Do not smother your fire pile.
- Be patient. These methods work, but they require 15 to 35 minutes depending on technique. Rushing is how fires go wrong.
- Never use gasoline, paint thinner, or alcohol over an open flame as a substitute. These are explosion risks, not fire starters.
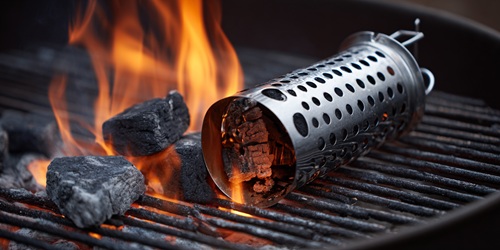 Method 1: The Charcoal Chimney Starter (Most Reliable)
The chimney starter is the single best tool a serious griller or prepper can own. It requires no chemicals, works every time, and costs around $15 to $40. If you do not own one, buy two and store one with your emergency supplies.
A chimney starter is a metal cylinder with a grate inside. You load charcoal on top, place your fire starter at the bottom, and light it. Convection does the rest. The coals are fully ready in 15 to 20 minutes.
Step-by-Step Instructions
- Fill the chimney starter to the top with charcoal briquettes or lump charcoal.
- Place 2 to 3 sheets of crumpled newspaper or a fire starter cube in the bottom compartment below the grate.
- Set the chimney on the bottom grate of your grill or on a fire-safe surface.
- Light the newspaper or fire starter through the holes at the bottom of the chimney.
- Wait 15 to 20 minutes. The coals are ready when the top layer begins to ash over and you see consistent orange glow.
- Carefully pour the lit coals into the grill using heat-resistant gloves.
Tip for preppers: Chimney starters are entirely compatible with off-grid use. They work in wind, in cold weather, and under field conditions with no electricity or chemical fuel required.
 Method 2: Newspaper and Kindling (Zero Equipment Needed)
This is the most primitive and most self-reliant method. It works using only materials found in or around most homes. No tools, no fuel purchases, no dependencies. If you had nothing else, this would still work.
Step-by-Step Instructions
- Crumple 5 to 7 sheets of newspaper into loose balls. Avoid glossy or colored paper.
- Place the newspaper in the center of your grill’s bottom grate.
- Layer dry small sticks or cardboard pieces on top of the newspaper in a loose teepee shape.
- Place charcoal loosely around and above the kindling, leaving air gaps.
- Light the newspaper from 2 to 3 sides at the base using a match or lighter.
- Let the fire build naturally. Do not close the lid. Feed more newspaper from the edges if the flame dies before coals catch.
- Once coals begin glowing, wait until at least 70% ash over before cooking.
This method takes 25 to 35 minutes and is more weather-dependent than others. Wind is your friend here. Position the grill so air flows through from the vents upward through the coals.
 Method 3: Electric Charcoal Starter
An electric charcoal starter is a looped heating element that you bury into the base of your charcoal pile and plug into a standard outlet. It heats coals to ignition point in 8 to 12 minutes with no flame, no chemical, and no skill required.
This is the fastest zero-chemical method for home use when you have power. For preppers, pairing this with a generator or solar setup keeps it functional in extended outages.
Step-by-Step Instructions
- Arrange charcoal in a pyramid on the grill grate.
- Push the electric starter loop into the base of the charcoal pile.
- Plug the starter into an outlet or generator-powered extension cord.
- Leave in place for 8 to 12 minutes. You will see coals beginning to glow and smoke.
- Unplug and remove the starter carefully. Place it on a heat-safe surface to cool.
- Spread coals and wait for ashing before cooking.
Do not leave an electric starter unattended and do not use in wet conditions. Store the starter wound loosely to avoid damaging the heating coil.
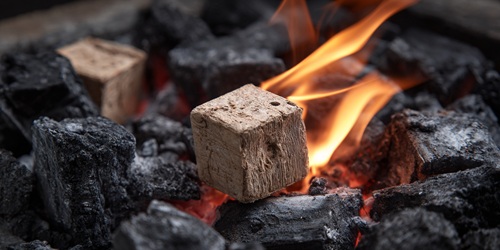 Method 4: Commercial Fire Starter Cubes or Blocks
Fire starter cubes are small compressed blocks made from wood fiber and wax. They are lightweight, store indefinitely, and each cube burns for 8 to 12 minutes with a sustained flame, which is more than enough to catch a charcoal pile. Brands like Weber, Rutland, and Fatwood make well-regarded versions.
For preppers, these are ideal for long-term storage. They are compact, waterproof variants are available, and they take up almost no space in a bug-out bag or emergency kit.
Step-by-Step Instructions
- Place 1 to 2 fire starter cubes at the center of your charcoal pile or inside a chimney starter.
- Arrange charcoal around and above the cubes.
- Light the cube directly with a match or lighter.
- Allow to burn undisturbed. Do not add more cubes after lighting.
- Coals should begin catching within 10 to 15 minutes. Full readiness at 20 to 25 minutes.
One box of 24 cubes costs around $6 to $10 and is enough for 12 to 24 fire sessions. Stock a case of these alongside your charcoal supply.
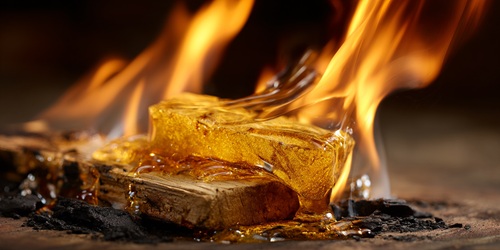
 Method 5: DIY Wax Fire Starters (Make Them Now, Use Them Later)
Homemade wax fire starters are one of the most cost-effective preparedness items you can make. The base recipe uses only two materials: paraffin wax or old candle stubs and a combustible filler like sawdust, dryer lint, cotton balls, or shredded cardboard.
Research published in materials science journals confirms that wax-based fire starters burn at high temperatures with sustained flame because paraffin has a heat of combustion of approximately 42 MJ/kg, making it an efficient and reliable fuel for starting solid fuel like charcoal.
How to Make Wax Fire Starters
- Melt paraffin wax or old candles in a double boiler (never directly over an open flame).
- Pack paper muffin cups with sawdust, dryer lint, or shredded cardboard.
- Pour melted wax over the filler material until saturated.
- Allow to cool and harden completely, at least 1 hour.
- Store in a sealed container or zip-lock bag in a cool, dry location.
How to Use Them
- Place 1 to 2 wax fire starters under your charcoal pyramid or inside a chimney starter.
- Light the paper cup edge or the exposed filler with a match.
- Allow to burn without interference. Each starter burns for 10 to 15 minutes.
- Coals should be ready in 20 to 25 minutes.
Wax fire starters store for years without degradation. Make a large batch now and you will never need to buy another fire starter product.
 Method 6: Vegetable Oil or Cooking Fat Method
This method uses pantry staples available in almost any kitchen or food storage supply. Cooking oil, bacon grease, or any solid cooking fat can serve as a fire starting fuel when applied correctly. This is a true grid-down improvisation skill.
The USDA’s food safety resources confirm that cooking oils used for fire-starting purposes do not contaminate food when charcoal is fully ashed before cooking begins.
Step-by-Step Instructions
- Soak 3 to 4 paper towels or a thick piece of cardboard in vegetable oil, bacon grease, or any cooking oil.
- Place the oil-soaked material at the center or bottom of your charcoal pile.
- Arrange charcoal loosely on top, allowing air gaps.
- Light the oil-soaked material from the edge with a match.
- Step back. The oil will ignite with a flare and then burn steadily for 5 to 8 minutes.
- Allow coals to catch and fully ash over before cooking.
Warning: Oil flares can be significant, especially with liquid oil versus solid fat. Always light from the edge, never hover over the pile, and never add oil after the fire is lit. Perform this outdoors only.
 Method 7: Alcohol-Based Gel Fire Starter
Isopropyl alcohol gel fire starters, including hand sanitizer in a pinch, can be used to help light charcoal. This is a bridge method between having something and having nothing. Alcohol gel burns hot and clean, leaving no petroleum residue or chemical taste.
This method works best when combined with a chimney starter or when the charcoal is already warmed. It is not a standalone solution for cold charcoal, but it is an effective accelerant in the right context.
- Apply a small amount of alcohol gel to 2 to 3 charcoal briquettes at the bottom of your pile.
- Light immediately with a long-reach match or lighter.
- Stand back. Alcohol flames are nearly invisible in daylight.
- Allow the charcoal to catch before adding more fuel.
- Never add alcohol gel to an already-burning fire. Flashback is a real risk.
Note: Reserve this method for situations where other starters are unavailable. Isopropyl alcohol is a more valuable general-purpose supply item in preparedness planning and should not be used carelessly.
Side-by-Side Comparison: All 7 Methods
| Method | Time to Light | Pros | Cons |
| Chimney Starter | Fast (15-20 min) | Reusable, reliable | Needs to carry the tool |
| Electric Starter | Medium (8-12 min) | Very easy, no flame | Needs electricity nearby |
| Fire Starter Cubes | Medium (20-25 min) | Compact, storable | Limited uses per pack |
| Newspaper & Kindling | Slow (25-35 min) | Zero cost, always available | Skill-dependent, can fail |
| Wax Fire Starters | Medium (20-25 min) | Burns long, reliable | Must make or buy ahead |
| Cooking Oil Method | Medium (20-30 min) | Uses pantry staples | Mess risk, smoke flare-up |
| Alcohol-Based Gel | Fast (15-20 min) | Widely available | Flammable, handle carefully |
Does the Type of Charcoal Matter?
Yes. The type of charcoal affects how quickly and easily it lights, which matters for all of these methods.
Lump Charcoal
Lump charcoal is made from actual hardwood burned in a low-oxygen environment. It lights faster than briquettes, burns hotter, and produces less ash. It is ideal for all of the methods above and is the better choice for preppers and serious grillers. The downside is less uniform heat and shorter burn time.
Charcoal Briquettes
Briquettes are compressed charcoal dust mixed with binding agents and sometimes accelerants. They are heavier to light without chemical help but burn longer and more consistently. If your briquettes contain embedded lighter fluid (look for labels saying ‘Match Light’ or ‘Easy Light’), these methods will work but the embedded chemicals make the briquettes harder to light without the fluid and they are unsuitable for long-term emergency use.
For long-term storage, lump charcoal in sealed containers is superior. Briquettes absorb moisture faster and their binders can degrade over time.
Storing Charcoal for Emergency Use
According to the NFPA’s grilling safety guidelines, charcoal should be stored in a cool, dry location away from flammable materials and moisture. Here is how preppers should think about charcoal storage:
- Store in sealed metal or hard plastic containers. Original paper bags allow moisture intrusion and pests.
- Keep away from gasoline, propane, and other flammable liquids.
- Rotate stock. While charcoal does not expire in the traditional sense, moisture damage renders it difficult to light.
- Stock at least 20 lbs per person for a 30-day supply if charcoal is your primary cooking fuel.
- Keep fire starters, whether cubes, homemade wax starters, or newspaper in the same dry storage container for a ready-to-go cooking kit.
Charcoal Safety: What Every Prepper Must Know
The methods in this article eliminate lighter fluid risk, but charcoal itself carries serious hazards that become even more critical in emergency scenarios.
Carbon Monoxide Is the Biggest Danger
The CDC reports that charcoal grills produce carbon monoxide (CO) at levels that can be fatal in enclosed or poorly ventilated spaces. Never burn charcoal inside a home, garage, tent, or enclosed shelter, even with windows open. CO is odorless and invisible. Deaths from this occur every year during power outages when people attempt indoor charcoal cooking.
- Always grill outdoors, at least 10 feet from any structure.
- Never use charcoal for heating inside a home under any circumstances.
- In emergency scenarios, have a battery-powered CO detector active near sleeping areas.
- Symptoms of CO poisoning include headache, dizziness, and nausea. Move to fresh air immediately if symptoms appear.
Ash Disposal
Allow ashes to cool completely for at least 48 hours in the grill before disposing. Do not place warm ashes in paper bags, plastic bags, or near flammable materials. Use a metal container with a lid for ash storage and disposal.
Building a Grid-Down Cooking System Around Charcoal
Charcoal is one of the best grid-down cooking fuels available to the average prepper. It is calorie-dense as fuel, stores well, is widely available in bulk, and can be used for grilling, smoking, and Dutch oven cooking. Pairing it with the lighter-fluid-free ignition methods above creates a completely self-reliant cooking system.
Your charcoal cooking kit should include:
- 2 chimney starters (one as backup)
- 50 to 100 homemade wax fire starters in a sealed container
- A supply of fire starter cubes as a store-bought backup
- A cast iron Dutch oven for covered cooking over charcoal
- Heat-resistant gloves rated for open-flame use
- Long-reach matches stored in a waterproof container
- A supply of lump charcoal in sealed metal bins
This full kit takes up roughly the same space as a large cooler and supports months of cooking capacity for a prepared family.
Frequently Asked Questions
Can I use vegetable oil instead of lighter fluid?
Yes. Soak a few paper towels or a piece of bread in vegetable oil and place it under your charcoal. It burns long enough to get coals going. It will produce some smoke initially, so keep clear.
How long does a chimney starter take?
A chimney starter typically gets charcoal ready in 15 to 20 minutes. You will know the coals are ready when the top layer starts to ash over and you see orange glow throughout.
Is newspaper safe to use for lighting charcoal?
Yes, plain black-ink newspaper is safe for lighting charcoal. Avoid glossy inserts or colored ads, which can release toxic fumes when burned.
What if I have no tools at all?
In a survival situation, build a small teepee fire with dry tinder and kindling, place charcoal around and above it, and let the wood fire ignite the coals. It takes longer but works without any special equipment.
Will food taste different if I use these methods instead of lighter fluid?
Food actually tastes better. Lighter fluid is petroleum-based and can impart a chemical taste if coals are not fully ashed over. All the methods in this article produce clean-burning charcoal with no chemical aftertaste.
How do I know when my charcoal is ready to cook on?
Charcoal is ready when at least 70% of the coals have a light gray ash coating. In low light, you should see a consistent orange glow. This typically takes 20 to 30 minutes from ignition depending on the method used.
Can I use pine cones or wood chips to start charcoal?
Yes. Dry pine cones are excellent natural fire starters and burn hot. Place them under the charcoal pyramid or inside your chimney starter. Wood chips work too, especially when combined with a small amount of kindling.
Final Thoughts
Knowing how to light charcoal without lighter fluid is not a niche skill. It is a core competency for any serious prepper, homesteader, or self-reliant household. Every single one of the methods above is proven, practical, and learnable in a single afternoon.
The chimney starter is your best long-term investment. Homemade wax fire starters are your cheapest and most stockpileable option. The newspaper and kindling method is your zero-dependency fallback when everything else is unavailable. Together, these give you redundancy, which is the foundation of sound preparedness.
Practice these now, before you need them. The worst time to learn a new skill is in the middle of an emergency. Light your next grill without lighter fluid, master the timing, and add this to your list of solved problems.
A Skill Like This Is Only the Beginning
Learning how to light charcoal without lighter fluid is exactly the kind of skill that separates casual campers from truly prepared people. It is simple, practical knowledge that becomes incredibly valuable when modern conveniences disappear.
But charcoal ignition is just one small piece of a much larger picture.
When you step back and look at long-term survival realistically, you quickly realize that fire, food, water, shelter, navigation, medical care, and long-term living skills all need to work together. Knowing how to start a grill fire is useful. Knowing how to survive for weeks or months in the wild is life-changing.
That is exactly why many preparedness experts recommend studying The Wilderness Long-Term Survival Guide.
This guide was created to teach the kind of skills people once relied on every day before modern infrastructure made us dependent on stores, fuel deliveries, and electricity. It walks you step-by-step through the survival knowledge that allows a person to function when the normal systems around them stop working.
Inside, you will learn things like:
- How to build reliable fires in wet, cold, or windy conditions
- Multiple ways to cook food outdoors without modern equipment
- How to find and purify water in the wilderness
- The safest methods for building emergency shelters
- How to identify edible plants and natural food sources
- Navigation skills that work without GPS or electronics
- Long-term survival strategies used by wilderness professionals
These are not theoretical ideas. They are practical field techniques used by bushcrafters, search-and-rescue teams, wilderness guides, and survival instructors.
Think about it this way.
If a power outage lasts a few hours, most people are fine.
If it lasts a few days, people begin to struggle.
But if supply chains break down or infrastructure fails for weeks, the people who already understand self-reliance skills are the ones who remain calm and capable.
That is the real value of learning survival knowledge now, while conditions are comfortable.
Even if you never face a major emergency, these skills make you:
- More confident outdoors
- More capable during storms and outages
- Less dependent on fragile systems
- Better prepared to protect your family
And if you are already interested in preparedness skills like lighting charcoal without lighter fluid, then you are exactly the kind of person who will benefit from expanding that knowledge further.
You can learn more about the guide here:
👉 Discover The Wilderness Long-Term Survival Guide
Many readers consider it one of the most practical resources available for building real-world survival skills that work both in the wilderness and during emergencies.
Because at the end of the day, preparedness is not about fear.
It is about confidence, knowledge, and the ability to take care of yourself no matter what happens.
You may also like:
 Join The Ask A Prepper Free WhatsApp Channel For Daily Tips And Tricks!
This Homemade Device Can Power Up Your Entire House 7 Days in a Row (Video)
Starting a Fire with Potassium Permanganate
DIY Waterproof Fire Starter
The Only Survival Fires You Should Know
Read the full article here


