

A rainwater collection system is easy to install and is a great way to not only save money on water bills, but to ensure an emergency supply of water is always on hand. Most systems collect the rain in large rain barrels up to 55 gallons and they can be purchased at home centers or online.
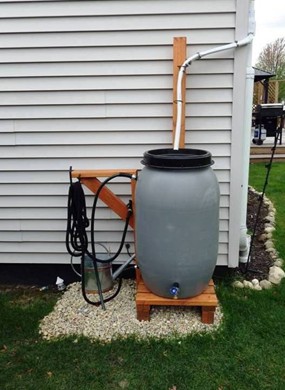
The roof of a home, shed, greenhouse or other outbuilding is the preferred collection area, and the gutters and downspouts on many roofs are used to collect and funnel the water to the rain collection barrel(s).
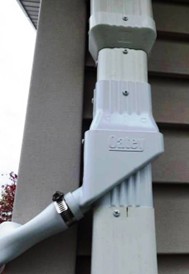
There are specialized attachments that can be connected to a downspout to collect the rainwater, or you can improvise a system from PVC and use a reducer coupling as funnel.
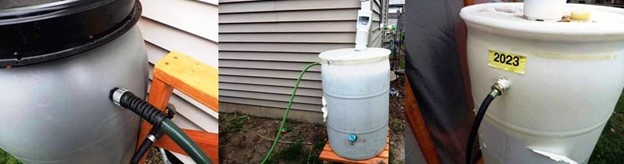
This simple rainwater collection system is great for most homes and purposes. However, you should know it is meant to deal with smaller projects. For instance, as you will learn below, you will have problems with water pressure. If you need something more complex, you can take a look at the pressurized rainwater harvesting and purification system in the No Grid Projects book.
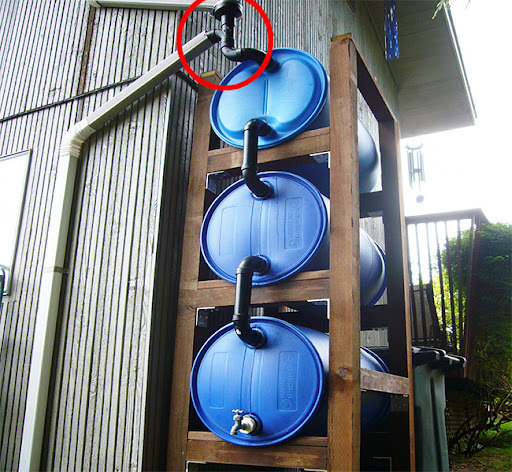
The more complex system (presented above) can store 165 gallons of water. The vertical storage increases pressure and removes the need to install a siphon or pump. With a completion time of just around 3 hours, you gain a rainwater harvesting and purification system capable of irrigating your garden for a lifetime.
Learn about the advanced rainwater collection system and 69 other ingenious projects that can help you protect your own family in times of economic crisis, long-term blackouts, riots, hyperinflation, martial law, hurricanes, or other unforeseen events that may come our way in the No Grid Projects book here.
No let’s get back to the simpler version anyone can build at home.
Rainwater Benefits
Aside from the fact that rain is free, rainwater has some positive characteristics not only as a potential source of emergency drinking water, but for plants in any garden. Rainwater does not have many of the minerals found in water drawn from underground sources, and is usually free of any pollutants from farm runoff or other pollutants common in many rivers and lakes. But, remember that in some parts of the US, collecting rainwater might be illegal. So, always respect the local laws. And you might also want to consider hiding your harvested rainwater in some situations.
But There’s a Caution

Rainwater is not necessarily pure water. This is especially true after it has run over the surface of a roof where dust, bird droppings and other contaminants in the air may have collected. There’s also the possibility that leaves, sticks, seeds, and other debris carried by the winds can run off into your barrel and clog the system.
We’ll cover some simple filtration solutions to keep your system clear of debris, and then look at some improvised filtration systems that can at least filter out particulate matter in any rainwater intended for drinking.
But here again, be forewarned. Filtered rainwater may look clear but bacteria from something as simple as bird droppings can still be resident so any rainwater intended for drinking should also be purified. Especially if it has been sitting in the barrel for a while. The best purification method is to boil it for at least 3 minutes.
Related: 10 Medical Supplies You Need to Have in Your House (Video)
The Basic Parts and Pieces of a Rainwater Collection System
 On the surface it seems simple. Just let a downspout drain into a barrel and you’ve collected rainwater. But there are some features of rain collection systems that make them more efficient and easy to use on a regular basis. Here are the basics:
1. The Barrel
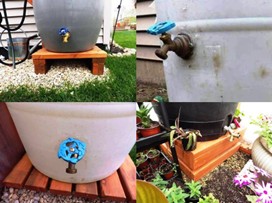
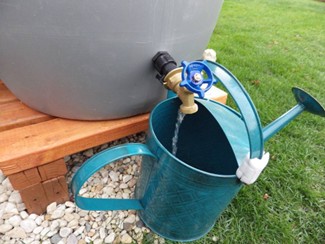
Most rain collection barrels have a spigot installed towards the bottom/front of the barrel. This makes it easy to draw water from the barrel for any reason.
If you are upcycling a barrel you can and should install a spigot in the same location.
Dedicated rain barrels also show up in a range of colors from white to black, grey and blue. The color of the barrel matters depending on its intended use.
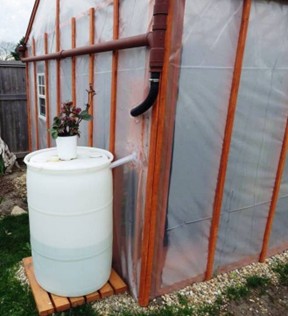
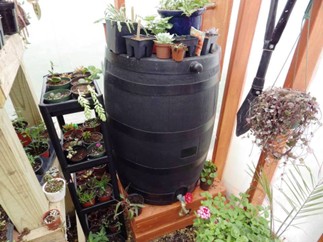
A black barrel will absorb heat from the sun and radiate the collected heat during the cold of night. That’s why many people use black barrels in greenhouses to collect rainwater.
A white barrel will reflect radiant heat from the sun and stay cooler. This is ideal for general outside usage. Grey barrels are neutral and are a good choice if you want to diminish the appearance of a rain barrel to some degree, and blue barrels are mostly used to differentiate the barrel as a container for water.
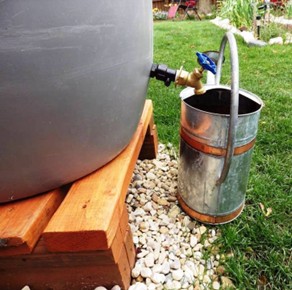
Another feature on most rain collection barrels is an overflow towards the top of the barrel on either side.
A hose can be attached to direct water to a second barrel, or the hose can be directed towards the ground and away from any building or structure. Some people attach soaker hoses to the end of these hoses to automatically water gardens with any runoff from the barrel.
Another standard feature on dedicated rain barrels is a built in filter on the top of the barrel.
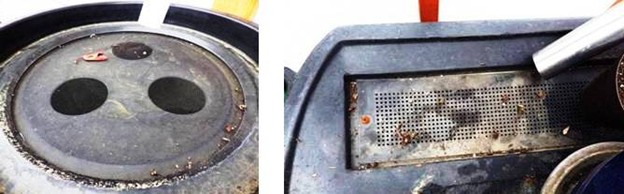
This collects leaves, sticks, debris and another other objects that have been carried to the barrel by the flow of the rainwater.
If upcycling a barrel from another use, there are filters that can be installed onto the downspout for the same purpose.
A Note on Upcycling Barrels: If you’re upcycling a barrel from a previous use to collect rainwater, make sure you know what was previously stored in the barrel. Many barrels are used for storage of chemicals that could be harmful to plants and especially people. The idea of collecting rainwater is to reuse it for a beneficial purpose. Using rainwater contaminated with harmful chemicals is not beneficial to anyone or anything.
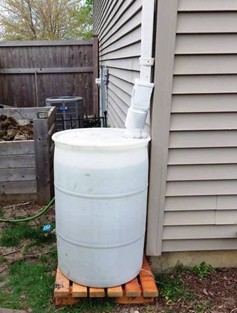
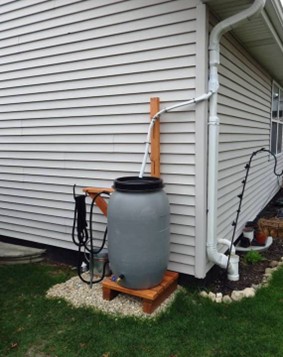
2. Barrel Platform

It’s okay to simply put your rain barrel directly on the ground, but if the ground is uneven you might want to consider building a platform. A platform also allows you to elevate the spigot a bit so you can fit a watering can or bucket easily under it.
The platform can be constructed from a combination of 4×4’s for the base and 2×4’s for the top. Measure and cut your pieces to fit the circumference of the barrel bottom. You might also want to put down a base of stone or bricks under the platform. Then again, the bricks and stone may be all you need for a stable base. Just remember, rain barrels are heavy. One-gallon of water weighs 7.5 pounds so a 55-gallon barrel will have a total, filled weight of more than 400 pounds. That’s almost a quarter ton.
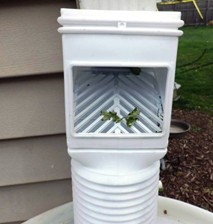
3. Rainwater Trapping and Funneling
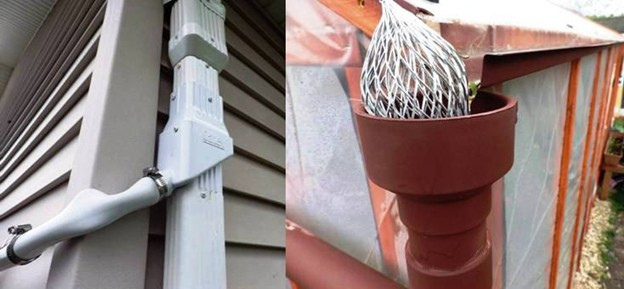
There are attachments for downspouts specifically designed to collect rainwater and direct it to either a hose leading to the barrel, or to directly channel it towards the top filter of the barrel. You can find these at some home centers or online.
If you have to, you can simply direct the rain to the top of the barrel from a cut downspout, but most of these traps and funnels have a filter to trap not only rainwater but debris from a roof.
You could also improvise a funnel using a PVC reducer. Be sure to drop in a leaf trap to filter out debris.
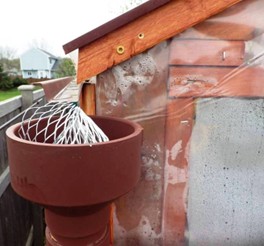
These are intended to be used to connect a larger length of PVC to a length of PVC with a smaller diameter. A 4-inch to 2-inch reducer attached to a length of 2-inch PVC with the 4-inch connection left open gives you an instant funnel that can capture rainwater from the end of a gutter.
You can use additional lengths of PVC to direct rain from other gutters to increase the roof area you are using for your rainwater harvest. You can use additional gutters as well. Just do what makes sense.
Installing Your Rain Barrel Collection System
Before you set up your rain barrel there are a few considerations to ponder. That’s important. You’re going to be doing some basic things to your home or outbuilding and it’s a hassle to take it all apart and move it because you determined a better place for it. With that in mind, here are some things to think about:
There are two location considerations. One is aesthetic and the other is functional. Aesthetically, most people prefer something like a rain barrel to be generally out of sight especially when it comes to the front of the home. Outbuildings like greenhouses or sheds are another story and the functionality of those structures make the appearance of a rain barrel less of an issue, but you might want to see if the back of the house is the best location aesthetically.
Another aesthetic consideration gets back to barrel color. Try to match the color of your barrel to the color scheme of your home if possible. Neutral grey is the usual default choice.
Functionally, you need your rain barrel to be in close proximity to a downspout. You can work the water around corners with a length of hose, but the closer you can get it to the rainwater source the better.
Related: These States Will Punish You for Harvesting Rainwater
You also want to consider sunlight. A location with a prominent southern exposure is going to get more sun. If you want your barrel to capture and radiate heat (a greenhouse is a good example), place your barrel where it is exposed to the most sunlight.
One the other hand, a northern exposure will minimize exposure to the sun and keep the water in your barrel cooler. It’s really up to you and your intended use. Water intended for drinking or just watering a garden is probably best with a northern exposure, and water for keeping things warm like a greenhouse are best installed inside the greenhouse with a southern exposure.
-
Downspout Channeling Installation
It’s tempting to jump in and get that barrel setup once a location has been determined, but there’s a step that should precede that: hook up how you’re going to trap and channel your water to your barrel. This will help you properly determine the ideal position and placement of the barrel measured in as little as inches to feet.
If your water trap or funnels are directly above the barrel, think about the location and height of any support or platform foundation and measure the height of the barrel. That will guide you as you cut and install your downspout channel.
If the downspout channel points to the left or right of the downspout with a hose attachment, install it and see where the end of the hose will be to determine the exact position for your barrel. You want a fairly direct channel for your water to follow and the barrel should end up in a position to do the best and most efficient collection.
-
Build the Foundation or Platform
Once you’ve identified where your barrel will sit, it’s time to design a foundation for rainwater collection to keep it level and support the weight. Bricks or stone will do but a short platform will allow you to elevate the spigot so you can fill a watering can or bucket.
To determine the height of the spigot, measure the distance from the spigot on the bottom of the barrel to the base of the barrel. Now, measure the height of your water can(s) and determine how many extra inches you need so you can easily put the can under the spigot for filling.
If all you’re going to do is attach a hose for watering to the rainwater collection system, the height of the platform is not as critical, but be forewarned. You are not going to get the same water pressure you’ll get from a conventional hose. Some water will make it through the hose but it may be more of a dribble than a steady stream like you’re used to from a exterior faucet.
Once the foundation or platform is in place, set the barrel on top positioning the top screen directly under the water outlet. Make sure your spigot is turned off and attach a hose to the overflow at the top of the barrel to runoff on the ground or fill another barrel.
If You Need More Power
While this rainwater collection system is basic and very useful, there are situations in which it is not enough for you. As already mentioned, water pressure is not that high and the water will mostly drip. It will not have the pressure you might need for watering a larger garden.
If you need more power, you can install a pump to the system. Just make sure that you do not do this if you do not know what you are doing. You can get extra electrical power for the pump with an extra device like the Smart Solar Box.
Use the Water From The Rainwater Collection System
It’s nice to watch the barrel fill but eventually you’re going to have to use some of that water. Otherwise you’ll just be running off water. If you’re using a watering can, it’s wise to have two of them. That way you can allow one to fill while watering with the other one. It’s a bit exasperating to watch and wait for a watering can to fill particularly when you start to get below a half barrel. That’s when the water pressure is steady but the flow is slow.
Over time you’ll get more experience with using your harvested rainwater collection system and you could always add another barrel next to it connected to the overflow valve. With any luck you’ll reduce your water bill and in an emergency you’ll always have at least some water on hand.
And I should add that the water you gain from the rainwater collection system can help you all around the home. I personally just started using my collected rainwater to start my own little natural pharmacy with the Medicinal Garden Kit, which includes:
- 10 packs with medicinal plant seeds
- Free Herbal Medicinal Guide: From Seeds to Remedies
Just think about how much money you spend at the pharmacy. The average American spends $1742 each year. The Medicinal Garden Kit is just $59. Why not take advantage?
But, you have to act fast. These garden kits go fast. ESPECIALLY during this time of the year!
See if there are still Kits available Here!
You may also like:
 How to Survive When All Water Is Gone
Backyard Projects That Might Get You Arrested (Video)
I Tried Drinking Water From My Stockpile and This Is What Happened
79 Edible Flowers in North America (with Pictures)
Homemade Water Wheel Electric Generator
Read the full article here