DIY Poor Man’s Smoker – Ask a Prepper
In a crisis, refrigeration becomes a luxury. What about your fresh meat? It’ll rot fast. Without a reliable way to preserve food, you’re one power outage away from losing the most reliable source of protein. Most people have no clue how to make food last when the grid fails. That ignorance could cost you more than just a meal. Still, there’s a way to fight back. Smoking meat isn’t just for flavor, but also an ancient survival tactic. It helps slow bacterial growth and extends the life of your meat when there’s no electricity, no freezer, and no second chances. The problem? Traditional smokers are expensive, bulky, and probably not something you have lying around. The solution? The “Poor Man’s Smoker.”
Materials and Tools
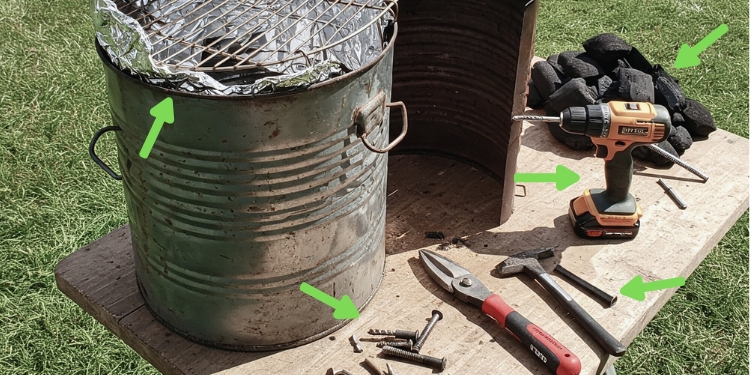
Built from a regular trash can and a few basic tools, this DIY setup can help you create a sustainable food source when everything else falls apart. Before you start building your smoker, you’ll need to gather a few materials and tools. Here’s a list of what you’ll need:
Metal trash can: This will serve as the main body of your smoker. Make sure to choose a metal trash can that is large enough to accommodate the amount of meat you plan on smoking.
Lid: A lid is necessary to trap the smoke inside the trash can and create the low and slow cooking environment needed for smoking meat.
Wire rack: A wire rack will keep the meat elevated, allowing the smoke to circulate all around it for even cooking.
Charcoal: Charcoal is used as the heat source in the smoker. You can use either briquettes or natural lump charcoal.
Drill: A drill is used to make holes in the trash can for ventilation.
Scissors or tin snips: Scissors or tin snips are used to cut the aluminum foil to size.
Hammer and nails: Hammer and nails are used to secure the wire rack inside the trash can.
Screwdriver: A screwdriver is used to attach the lid to the trash can.
 Aluminum foil: Aluminum foil is used to line the bottom of the trash can to make cleaning up after smoking easier. One fascinating detail about aluminum foil is that it has far more uses than just in the kitchen, especially when your survival depends on it.
On page 185 of this book, I stumbled across an entire section filled with surprising and life-saving ways to use foil… including how to start a fire with it.
Yes, something as ordinary as foil can turn into a critical survival tool when everything else fails. But that’s not all. Joel Lambert is a former U.S. Navy SEAL, trained to deal with the most difficult survival situations. You should check what he has to say on how to handle other essential items for prepping like HAM radios, multitools, and even bleach.
Step-by-Step Instructions
Building a smoker from a trash can is a relatively simple process, as long as you stick to the plan. Here’s how to do it:
Step 1: Cleaning the Trash Can – start by cleaning out the trash can, making sure there is no residue or smell left in it.
Step 2: Drilling Holes for Airflow – use the drill to make holes around the bottom of the trash can. This will allow air to flow into the can and fuel the fire.
Step 3: Creating a Door for the Smoker – next, you’ll need to create a door on the side of the trash can. You can use a saw or tin snips to cut an appropriate-sized hole, large enough to fit your food in and out.
Step 4: Adding Ventilation at the Top – at the top of the trash can, you’ll want to drill a few more holes for ventilation. This will help to regulate the temperature inside the smoker.
Step 5: Installing a Wire Rack for the Meat – finally, fit a wire rack in the bottom of the trash can. This will hold the meat and keep it off the bottom of the can.
Related: Getting Aluminum From Aluminum Cans for Survival
Using the Smoker
You gathered the materials, followed the steps, and finally built the structure. But here’s the part no one tells you: if you don’t know how to use it properly, your DIY smoker becomes nothing more than a metal box full of spoiled meat. In a crisis, that’s not just a waste. It’s a threat. So here’s how to correctly use the smoker:
Lighting the Charcoal
 Use a chimney starter. Never lighter fluid or chemicals. If you contaminate your fuel, the smoke will carry it directly into your food. That means toxic fumes, off-flavors, and meat you can’t trust to eat. Fire is essential if you want your food to have the texture and quality you expect, whether you’re preparing at home for crisis situations or trying to survive in the wilderness.
Starting a fire is an art that too few of us still master today, but with the right information, you can learn how to build a fire even in rainy conditions. I’ve researched this topic extensively, and THIS is the best guide I’ve found. From choosing the right types of wood to actually starting the fire and keeping it going, everything is thoroughly explained across the 10 pages dedicated entirely to this topic. I strongly recommend reading this section carefully. Being ready when things get critical might depend on it.
Placing the Charcoal
Pour the lit charcoal into the bottom of the can, spreading it evenly. Uneven heat leads to raw or improperly smoked meat – both dangerous when refrigeration isn’t an option.
Placing the Meat
Use a wire rack to elevate the meat above the coals. Without airflow and proper spacing, the smoke won’t circulate, and the meat won’t cook thoroughly.
Closing the Lid
Seal the lid to contain heat and smoke, but not too tightly. Poor ventilation can suffocate the fire. Too much airflow, and the smoke escapes, leaving you with dry, flavorless results.
Monitoring Temperature and Smoke
Keep the internal temperature steady – around 225°F (107°C). Add charcoal and wood chips gradually. Too little heat lets bacteria thrive. Too much, and the meat burns on the outside while staying raw inside.
Critical Mistakes That Ruin Everything
-
Using galvanized trash cans: these release zinc fumes when heated, which are highly toxic.
-
Ignoring cleanliness: unwashed racks or reused components can introduce harmful bacteria.
-
Over-smoking: heavy black smoke doesn’t flavor – it poisons and ruins.
- Lack of airflow control: the smoker becomes unpredictable, either choking the fire or failing to cook.
➡️Stop Doing THIS to Your Food – the mistakes that could RUIN your prepping efforts (Watch VIDEO)
Smoking Techniques
Many people believe smoking meat is just about flavor. But in a real survival scenario – or even during a prolonged blackout or crisis – this method becomes a dangerous balancing act between nourishment and contamination. If you don’t pay attention, you’re not just ruining a meal. You’re risking your health. Here’s what you need to know before you even begin:
1. Wood Choice Isn’t Just About Taste
Different woods release different compounds when burned. Mesquite and hickory create bold smoke. But overdo it, and your food will taste like soot and ash. Fruit woods like apple or cherry are milder, but don’t assume they’re “safe by default.” Wet or treated wood can introduce toxins into your meat.
2. Rushing the Process Can Ruin Everything
Smoking is not fast. If you try to speed it up, you risk undercooked meat. Raw or unevenly cooked meat can harbor bacteria that thrive in low temperatures. In a crisis, poorly cooked meat isn’t just a disappointment – it can become a serious liability. Food that isn’t prepared properly won’t just fail to nourish you… it could put your health at risk when you can least afford it. When things go south, you can’t rely on luck. What you need are proven recipes and survival techniques that won’t fail you when it matters most.
That’s exactly what you’ll find in this book that includes well-tested, clearly explained recipes – some of which are based on grilled meat, prepared in a way that preserves both flavor and shelf life. If you don’t want your emergency food supply to betray you, now is the time to learn how to make meat that you can actually rely on.
3. Temperature Control Is Not Optional
If your heat drops too low, you create a perfect breeding ground for bacteria. If it spikes too high, you burn the exterior while leaving the inside raw. You must monitor the heat constantly. There’s no “set it and forget it” when your safety is on the line.
4. Never Forget: You’re Playing with Fire
Literally. One moment of carelessness, and your backyard project turns into a fire hazard. Never leave the smoker unattended. Always smoke in a fire-safe location. Keep water or a fire extinguisher close, and know how to use it.
Related: How To Make Potted Meat
The Oven That Cooks Without Fire, Fuel, Smoke, or Smell – A Great Alternative
I’m deeply committed to preparing my home for the inevitable crisis looming on the horizon. After reading hundreds of pages – complex books and detailed articles – I came to a clear conclusion: a DIY smoker is an excellent solution for food preparation. But then I found something even more intriguing. I discovered a way to build a special type of oven – one that cooks food without fire or fuel.
Why did this option catch my eye? Because when SHTF, the last thing I want is to draw attention. I don’t want desperate neighbors – or worse, FEMA – realizing that I still have access to food and supplies. And this oven? It produces no smoke, no smell. What does that mean? It means that when chaos erupts and people are starving, I’ll still be able to cook discreetly, without inviting danger to my doorstep.
Be smart. Make sure you have the right knowledge – or at least access to it – before the world starts unraveling. You can get a physical copy of the No Grid Survival Projects book, that teaches you exactly how to build this scentless, smokeless survival oven. And while you’re there, you’ll uncover countless other strategies that might one day save your life. We’re talking about methods to secure your home against intruders, preserve and store food safely, generate your own water and electricity, and much more.
Final Thoughts
In a world where supply chains collapse overnight and refrigeration becomes a distant memory, preserving your food isn’t just smart. It’s essential for survival. The clock starts ticking the moment the power goes out. Your meat? Spoils fast. Your options? Shrink by the hour. That’s why building a “Poor Man’s Smoker” out of a simple trash can might be one of the smartest moves you ever make.
However, building a smoker is easy. Using it right – under pressure, with limited resources – is what separates success from failure. If you mess it up, you won’t just lose a meal. You’ll lose a crucial food supply when you need it most. Don’t assume you’re safe because you “built something.” Test it. Learn it. And respect the risks.
You may also like:
 15 Weird Foods That Were Common During The Great Depression
Forgotten, Long-Lasting Foods That Don’t Need Refrigeration (Video)
How Long Does Flour Last
How to Build a Clay Pot Smoker
Foods You Should Never Cook in Cast Iron
Read the full article here


