

If you read old homesteading manuals, you’ll notice they make root cellars sound simple. Dig a hole, maybe add some timber framing, stock it with potatoes and carrots, and you’ve got cold storage covered. But people fail to realize that those instructions were written for people in Vermont and Michigan, places where the ground naturally stays cool and winter temperatures plunge below freezing for months.
Try that approach in Arizona, Texas, or Southern California, and you’ll end up with a warm cave. The earth temperature follows ambient air temperature with some lag, and when your ambient temperature averages 95°F in summer, the ground six feet down might hit 70-75°F. Better than surface temperature, sure, but nowhere near the 35-40°F you need for proper long-term food storage.

So, what’s a hot-climate homesteader supposed to do? Should they give up on cold storage entirely and resign them to relying on grid power indefinitely? Well… not quite. There are methods that can achieve genuine cold storage even when you’re living somewhere that hits triple digits regularly.
Understanding the Challenge of Hot Climates
Cold cellars work in traditional climates because of stable, cool earth temperatures. Below the frost line (typically 3-5 feet deep in most northern states), soil temperature remains relatively constant year-round, usually between 45-55°F. That’s cold enough for root vegetables, canned goods, and many preserved foods.
In hot climates, especially the Southwest and Deep South, the earth never gets that cool. At six feet deep in Phoenix, soil temperature might range from 65°F in winter to 75°F in late summer. That’s warm enough to sprout potatoes, encourage bacterial growth, and significantly shorten storage life of most foods.
You need additional cooling mechanisms beyond passive earth insulation. You need evaporative cooling, better insulation, strategic placement, or combinations of these approaches. You’re essentially building a refrigerator that runs on physics rather than electricity.
>>For anyone building off-grid, that concept—letting nature do the work—is at the heart of self-sufficiency. This complete off-grid manual shows how to power, heat, and cool your homestead without relying on the grid.
The good news is that building a cold cellar is doable with materials most people can access and skills most folks can learn.
Below are three methods you should consider if you are living in a hot climate.
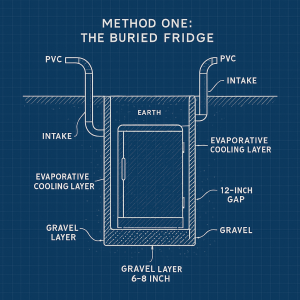
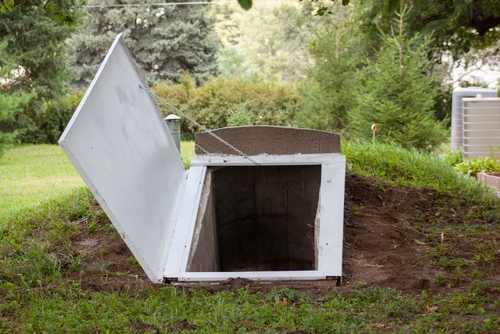
Method One: The Buried Fridge
This is probably the most straightforward method for hot climates, and it works surprisingly well if done correctly. You’re using an old refrigerator or freezer as a pre-built insulated container and leveraging earth temperature plus strategic ventilation to achieve cold storage.
Modern refrigerators have excellent insulation with typically 2-4 inches of polyurethane foam between the interior and exterior shells. If you are burying the fridge, you’re surrounding that insulation with earth at a more stable temperature than air, then using natural convection and evaporative cooling to drop temperatures further.
Site selection matters more than you might think. You want the north side of a hill or slope if possible, where the ground receives less direct solar heating. Avoid areas with high water tables because you will be digging deep, and hitting groundwater ruins everything. Look for well-draining soil and avoid clay that holds moisture since it can work against you in some designs.
>>Knowing your ground and water table is vital not only for cold storage but also for survival water systems. Here’s how to build an independent water source that runs without electricity or city supply.
Position your buried fridge under existing trees or on the north side of structures. Shade is your friend and every bit of it reduces heat gain at the surface, which eventually conducts down to your storage depth.
The hardest part is the digging process since you’ll need to dig a hole roughly 6-7 feet deep, wider than your fridge by about 18 inches on all sides. That’s a substantial hole, figure 8 feet by 8 feet if you’re burying a standard fridge, deeper and wider for a chest freezer. The extra space allows for drainage material and air gaps that become part of your cooling system.
Here’s what I recommend: Dig your hole and line the bottom with 6-8 inches of gravel for drainage. This prevents your fridge from sitting in water if you get heavy rains or any groundwater seepage. Set your fridge in the hole and remove the door or prop it open permanently.
This is non-negotiable since old refrigerators have killed children who climbed inside and couldn’t get out. Even buried, that risk exists so replace the door with a fitted wooden panel or heavy tarp that you can secure from the outside.
Now comes the clever part of the entire process. Install ventilation pipes (4-inch PVC works well) that run from your fridge interior up to the surface, positioned to catch prevailing breezes. You want intake pipes on the side where cool evening air comes from (typically north or east in most US locations) and exhaust pipes on the opposite side.
Extend these pipes several feet above ground level, and cap them with mesh to keep critters out while allowing airflow. The principle is simple: cooler evening and night air sinks down through the intake pipe, displaces warmer air through the exhaust, and gradually reduces interior temperature.
Add a layer of evaporative cooling by surrounding the fridge with a 12-inch gap filled with sand or clay soil that you keep damp. Water evaporating from this material draws heat away from the fridge exterior. In dry climates like the Southwest, evaporative cooling can drop temperatures by 15-20°F compared to ambient earth temperature.
>>Using moisture to control temperature is also how early settlers preserved food long before electricity. Discover dozens of similar pre-electric preservation methods used for centuries.
Once your ventilation and cooling layer are in place, backfill around the fridge with excavated soil, leaving your ventilation pipes exposed. Mound soil over the top, creating a hill that sheds water away from your storage area.
You’ll need a way to get food in and out. Some people install the fridge horizontally (on its back), creating a top-access design where you lift a hatch to reach inside. Others keep it vertical and create a small underground vestibule or tunnel leading to the front. The horizontal method is simpler but means everything stacks vertically, making organization harder.
With this full setup you can realistically achieve internal temperatures of 45-55°F during summer months, dropping to 35-45°F in winter. That’s cold enough for root vegetables, canned goods, seeds, and many preserved foods.
>>And for those who want ready-to-store protein without worrying about spoilage, this shelf-stable canned meat offers real nourishment that keeps for decades without freezing or electricity.
The zeer pot which is a clay pot inside another clay pot with wet sand between them, is ancient technology from North Africa. Evaporative cooling at its simplest. However, the classical zeer pot is small, and it doesn’t provide a lot of storage space. You will need something larger and more robust for serious food storage.
So, start by digging a pit about 5-6 feet deep and 6 feet in diameter. You’re aiming to create a cylindrical underground chamber. The depth puts you below surface temperature fluctuations and the earth acts as baseline insulation.
Line the walls with unglazed clay bricks or build a double wall from cinder blocks with a 4-inch gap between. That gap is critical since that’s where evaporative cooling happens. The inner wall is your storage chamber and the outer wall contains the evaporative medium.
If you’re using cinder blocks, you can fill the gap between walls with sand, perlite, or even crumpled newspaper. The key is a material that wicks water and has lots of surface area for evaporation. Sand is cheap, traditional and works well, but perlite provides better performance in some conditions.
>>The same basic materials also help create low-tech cooling chambers inside greenhouses. See how homesteaders combine soil, water, and airflow to grow food year-round.
Once the hole is ready, install a drip irrigation line or perforated PVC pipe at the top of the gap between walls, creating a continuous slow drip that keeps your evaporative medium damp. This water slowly migrates down through the sand or perlite, evaporating as it goes and drawing heat from the inner chamber.
Water needs vary by climate. In the arid Southwest, you might need 5-10 gallons daily to keep the system functioning and in more humid areas, less. Connect your irrigation line to a small reservoir that you refill weekly, or plumb it directly to a water source if available.
Install ventilation pipes similar to the buried fridge design with intake and exhaust pipes positioned to catch cool evening breezes. This air movement accelerates evaporation and helps vent heat.
At the bottom, you need drainage so that the water you’re dripping in has to go somewhere. A gravel bed beneath the structure with a drain pipe leading away prevents water accumulation and subsequent structural problems.
Cover the top with a wooden or metal roof that extends beyond the walls, providing shade while allowing air circulation beneath. You want protection from direct sun and rain, but you don’t want to seal the top because air needs to flow. Some builders create a double roof with an air gap for additional insulation.
>>Shade and airflow are everything in hot climates. Check out this compact farming system that applies those same cooling and shading principles to keep crops producing even in heat waves.
Create an access hatch or door in your roof structure. For a large chamber, you might build wooden shelving inside before closing the top, making organization easier.
A well-built clay cooler in a dry climate can achieve temperatures 25-30°F below ambient air temperature. If your ambient is 100°F, you might see 70-75°F inside, not cold storage, but significantly cooler. Combined with the earth’s insulating effect (starting at 70°F instead of 95°F), you can potentially reach 50-55°F, approaching usable cold storage range.
In humid climates, expect more modest results, maybe 10-15°F below ambient because evaporation is less efficient. This method works best in the Southwest, High Plains, and other low-humidity regions.
Method Three: The Deep Underground Pit
This is the most labor-intensive method, but I believe is the most effective for hot climates. You’re going to dig deep, about 10 to 15 feet down, where even in hot climates, earth temperature is cooler and more stable.
I must warn you that the challenge for this method is excavation safety. Once you’re deeper than 4-5 feet, you’re in cave-in territory. This isn’t a weekend shovel project and it requires shoring, possibly equipment, and serious attention to safety.
For deep pits, you absolutely need to know what’s underground. You have to locate utilities before digging and test soil stability since sandy soil requires more shoring than clay or rock. You also need to check water table depth because hitting groundwater at 12 feet deep ends your project instantly.
If you’re hand-digging (which is exhausting), you need to work in stages. Dig down 3-4 feet, then install timber shoring before continuing. Use 4×4 posts vertically at corners with horizontal 2×8 planks against the walls. This prevents collapse and will save your life.
For larger projects, renting a mini excavator makes sense if you have access for the equipment. You’ll still need shoring as you go deeper, but excavation happens in hours instead of days.
The goal is a chamber approximately 8 feet by 8 feet at the bottom, large enough to walk into and stock with shelving. Smaller dimensions work if you’re willing to access from above via ladder.
Once you’ve reached target depth, you need to turn your pit into a functional storage space. You could pour a concrete floor for moisture control and stability. A 4-inch slab over gravel drainage provides a permanent, stable base.
If the soil is unstable or the excavation is uneven, line the pit with block walls. Be sure to include weep holes at the base for drainage. For added temperature control, you can insulate the outside of the walls with rigid foam board before backfilling.
Installing a sump pump in one corner with drainage leading to a collection point is also recommended. Even with good drainage, some moisture accumulation is inevitable this deep. A small battery-powered pump that kicks on occasionally can prevent flooding.
>>You can power that pump directly from a solar source too. Learn how to build reliable solar systems for tools, water, and ventilation using parts you already have.
You’ll need stairs or a permanent ladder for access. Wooden stairs are easier to build; metal is more durable. Make them steep (like ship’s ladder steep) to minimize the horizontal space they consume.
Ventilation at this depth is critical not just for cooling, but for safety. Pockets of carbon dioxide can accumulate in deep pits. Install intake and exhaust pipes as before, but make them taller. You want at least 4-6 feet above ground to catch breezes and create draft.
Consider adding a solar-powered ventilation fan on the exhaust pipe. This isn’t strictly necessary, but it ensures air circulation even on still days.
Your work is almost done and now you have to cover your pit with a roof strong enough to walk on and well-insulated. Timber framing with plywood sheathing, covered with rigid foam insulation, then waterproof membrane and soil works well. You’re essentially building an underground room with earth berms on all sides.
Include a hatch or door for access. Make it sturdy because you’re not just protecting food, you’ll also preventing someone from falling into a 15-foot pit. A locking hatch provides security and keeps children and animals safe.
A properly built deep pit in a hot climate can achieve consistent temperatures of 50-55°F year-round, sometimes cooler. You’re essentially tapping into the earth’s natural thermal mass at a depth where surface conditions have minimal impact. This is true cold storage, comparable to what traditional root cellars achieve in cool climates.
>>Once you experience that stability, you’ll realize why true self-sufficiency means controlling temperature as much as food. This off-grid guide shows how to combine earth cooling with power-free heating systems for a complete setup.
Maintenance
Keep in mind that none of these systems are install-and-forget. The buried fridge needs the evaporative layer kept damp in dry months. Clay coolers require daily water input. Deep pits need ventilation monitoring and occasional pump maintenance.
Check stored food regularly. One rotting potato can spoil an entire batch through ethylene gas production. Temperature monitoring helps so install a simple thermometer inside your storage area and check it weekly.
Expect to troubleshoot and I can vouch that your first year will reveal design flaws or unexpected challenges specific to your site. Maybe ventilation isn’t adequate, or drainage needs improvement, or insulation isn’t quite enough. Treat the first season as a learning year and plan to make modifications.

Concluding
The real value of these systems become obvious when powered refrigeration isn’t an option. Having several hundred pounds of root vegetables in stable cold storage means your family eats well while others are scrambling.
>>When that happens, having dependable sources of protein makes all the difference. Many homesteaders now keep a stock of high-quality canned beef for emergencies or long outages.
So yes, cold storage in hot climates is harder than in cooler regions. It requires more work, more creativity and more maintenance. However, it’s absolutely achievable, and once built, it provides food security that can’t be turned off with a switch or disrupted by infrastructure failures. In my opinion, that’s worth the effort.


Read the full article here


")

